Why Is My Roomba Not Charging? (SOLVED)
Cleaners Talk is reader-supported. This post contains affiliate links, we may earn a commission at no additional costs to you. As an Amazon Associate we earn from qualifying purchases.
Roomba not charging? We understand that it can be borderline annoying. So does it mean that it’s time to throw away the expensive machine and spend your hard-earned money on a new one? Relax, the solution is easier than you may think. To solve the problem, first you need to know why your iRobot is not charging.
Why is your Roomba not charging? The biggest reason why your Roomba is not charging is because of dirty charging contacts. Both the Roomba’s charging contacts on the robot and Home Base must make a clean connection to perform a charge. Wipe the charging contacts with dry cloth to solve the issue.
While the above trick works most of the time, there are certain instances where a Roomba still won’t charge. In this post, we will thoroughly troubleshoot the issue: why is my Roomba not charging? By the end of this article, your beloved Roomba should be up and running as it should. Let’s get started.
Roomba Not Charging? Here’s Why:
In addition to dirty charging contacts, a Roomba may not charge because the caster wheel is clogged, or because the battery is not placed properly. It can also be caused by the combination of all three. With that said, here’s the detailed explanation of each cause of a Roomba’s failed charging problem:
1. Dirty Charging Contacts

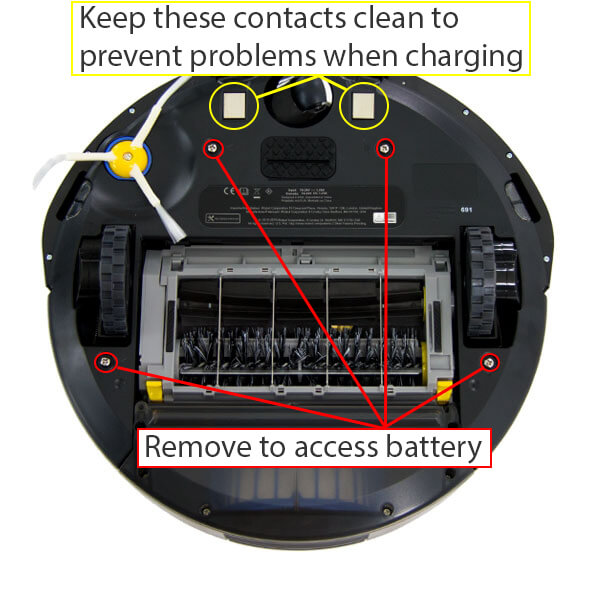
Over time, dust and debris can build up on the charging contacts of both the robot and the charging station. The Roomba's charging contacts are located under the front bumper of the robot. Because they are located in front of the brushes, they come in contact with a lot of debris and can get dirty easily.
To perform a successful charge, the charging contacts on the Roomba must make a clean connection with the charging contacts on the charging station. If the charging contacts on the robot are dirty, it increases the resistance in the charging circuit and reduces the effectiveness when charging.
In short, your Roomba won’t charge properly.
2. Clogged Caster Wheel


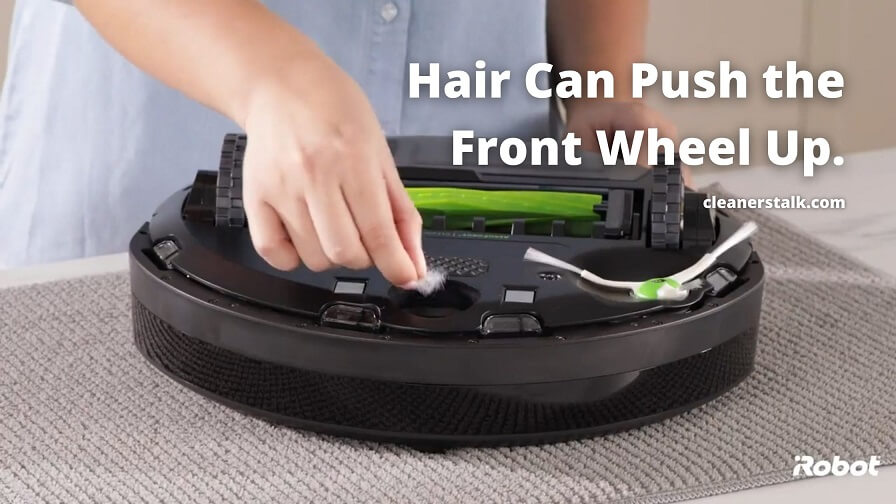
The other likely cause of a Roomba’s charging problem is a clogged caster wheel. Over time, gunk, hair, and carpet fibers can build inside the wheel cavity, especially if you have pets in your house. Whenever the caster wheel is not spinning freely, it may be the reason behind your Roomba’s charging problem.
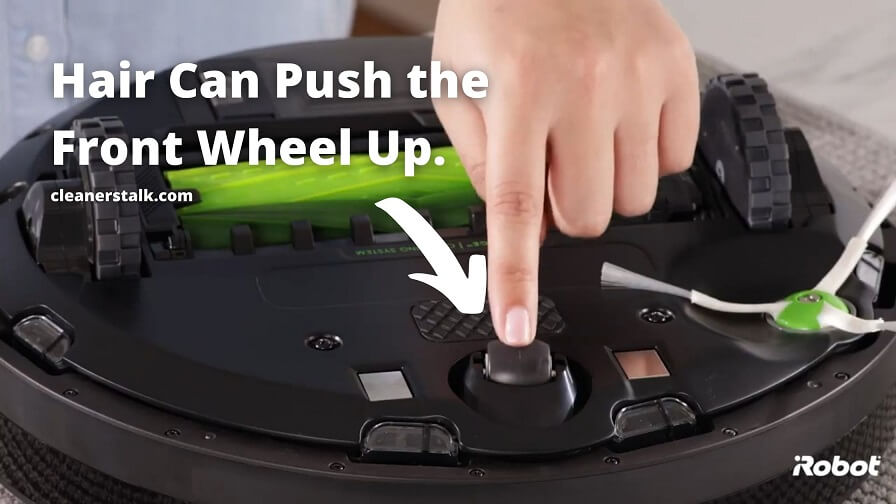
If a large amount of gunk builds up inside the wheel cavity and housing, it can essentially push the wheel up. Because the caster wheel is located in the middle of the charging contacts, a clogged one can cause the robot to “hover” above the charging station and hinder the charging contacts from making a clean connection.
3. Battery Not Placed Properly
However, if the charging problem is happening with a new Roomba that has never been activated, or is happening after you have just received a replacement battery, the battery placement may have shifted. We recommend removing the battery and re-inserting it back to the robot to ensure proper contact.
A new lithium-ion battery must be woken up on the charging stations before its first use. Place the Roomba on the charging station, making sure the charging contacts connect properly. It may take several seconds for the robot to wake up. Once the power indicator turns green, it will go out in about 4 seconds.
The Roomba will continue to charge...
How to Fix a Roomba That Won’t Charge:
Assuming that your Roomba’s is not new, the battery is placed properly, and has worked many times before, there are two quick and easy solutions to fix the charging issue. After doing these steps, your Roomba should be up and running in no time. With that said, here’s how to fix a Roomba that won’t charge:
1. Wipe and Clean the Charging Contacts
To clean the sensors and charging contacts, start by turning your Roomba upside down. Wipe both charging contacts with a clean, dry cloth. Next, you need to clean the charging station as well. Place it on a flat surface and wipe each charging contact of the home base with a clean dry cloth. This should solve the charging issue.
- PACKAGE CONTENT - 400 medium 2-ply prep pads
- INDIVIDUALLY WRAPPED - Each pad is individually wrapped and sealed to keep it protected and moist.
- FOUR-LAYER WRAP - The 4-layer wrap provides an air tight seal that prevents leakage and drying out.
If the charging contacts are particularly dirty, one simple and easy way to remove the dirt is to use sterile alcohol prep pads (link to Amazon). They are perfect for cleaning the charging contacts because they evaporate quickly and leave nearly zero oil traces. It is non-toxic as well.
2. Remove Gunk From the Caster Wheel
If the caster wheel is not spinning freely, start by pulling the caster wheel assembly to remove it from the robot. Push firmly on the wheel to remove it from the wheel housing. Remove any hair and debris from the wheel. Reinstall the wheel into the housing, ensuring that both sides of the axle snap firmly into place.
While you have access to the wheel cavity, use your fingers and remove any debris you find. This is where gunk and hair tend to build up most often. You can also wipe the area with alcohol wipes as well. Once the cavity is cleaned, reinstall the caster wheel back into the robot. The caster wheel should now move freely.
If All Else Fails, Reboot
After doing all of the above instructions, your Roomba should charge properly. However, in the rare occurrence where the Roomba still won’t charge, your last option is to reboot it. Rebooting your Roomba tends to fix most issues. For the complete guide, you can read our simple article on how to reset a Roomba.
If the behavior continues even after doing all of the above steps, please contact the iRobot Customer Care. The helpful team of iRobot support should be able to diagnose the problem and provide you with the necessary steps for you to follow. Be ready to provide proof of purchase for warranty claims.
You can also diagnose the charging error right here.
Bottom Line
And there you have it. The answer to the question: why is my Roomba not charging? See how easy the solution is? With just two simple actions to take, your Roomba should be performing in tip top shape. You are now well-informed with knowledge on how to maintain your Roomba and ensure its longevity. 🙂
You may also want to read our comparison reviews:

