Roomba Charging Error Complete Troubleshooting Guide
Cleaners Talk is reader-supported. This post contains affiliate links, we may earn a commission at no additional costs to you. As an Amazon Associate we earn from qualifying purchases.
You don’t need to be an engineer to know that a Roomba runs on battery.
Inevitably, the battery can malfunction and a charging error can happen. In this post, we will help you troubleshoot a Roomba charging error. Use the quick navigation tab below to find a solution quickly.
IMPORTANT: A Roomba charging error is different from a Roomba error code. If your Roomba is experiencing an error while running, please go to the troubleshooting guide right here.
Roomba Charging Error Troubleshooting
The charging error troubleshooting guide below applies to all Roomba models, including the Roomba 500, 600, 700, 800, 900, I, E, and J Series.
When a Roomba 500, 600, 700, 800, and 900 Series experiences a charging error, it will tell you something is wrong with a blinking troubleshooting, CLEAN, or battery indicator and a two-tone “uh-oh” sound followed by a narrated voice. The indicator will vary by model.
- Roomba 900 series says “Charging error (number). Please open the iRobot App for help.”
- Wi-Fi connected Roomba 600 and 800 series says “Charging error (number). Please open the iRobot HOME App for help.”
- Roomba® 500, 600, 700, and 800 series says “Charging error (number).”
When a Roomba I, E, and J Series experiences a charging error, it will tell you something is wrong with the light ring turning red followed by a narrated voice.
A message or notification may also appear in the iRobot HOME app.
Charging error 1: Battery is not connected or detected
Charging error 1 means the battery is not connected or the battery is not detected.
If you are experiencing a Roomba charging error 1, please do the following:
- Check that you are using an authentic iRobot Lithium Ion Battery. Charging errors can occur with counterfeit batteries.
- Make sure a battery is installed. If you recently received a service robot, ensure the original battery is installed.
- Remove the battery and look for anything that may be obstructing the battery contacts, such as the yellow battery pull tab. You can learn how to remove and replace a Roomba battery right here.
- Ensure proper contact between the battery and robot.
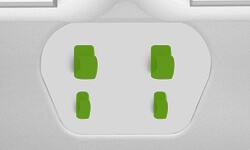
For robots with tabs in the battery well, use the back of a pen to gently pull or bend the two (2) small battery contacts upward.
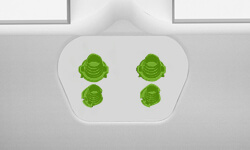
For robots with a coil spring in the battery well, simply remove the battery and with slight pressure re-install the battery to ensure that the battery is making contact with the charging contacts on the robot.
Reinstall the battery, replace the bottom cover and battery door, and then place your Roomba back on the Home Base to try charging again. If the error message persists, contact iRobot Customer Care.
Charging error 2: Battery is not charging
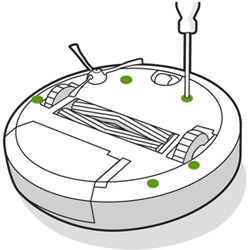
Charging error 2 means the Roomba battery is not charging. Please remove the edge sweeping brush and bottom cover to access the battery and check that you are using an authentic iRobot Battery.
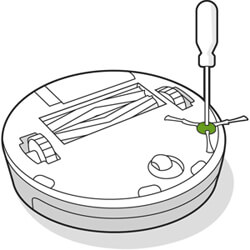
Charging errors can occur with counterfeit batteries.
If you are using an iRobot battery and have encountered this error, please contact iRobot Customer Care.
Charging error 3: Charging system is not working properly
Charging error 3 means the Roomba’s charging system on the robot is not working properly and your robot may need to be replaced. Please contact iRobot Customer Care for assistance.
Charging error 5: Charging system is not working properly
Charging error 5 means your Roomba's charging system is not working correctly. Check that you are using an authentic iRobot battery. Charging errors can occur with counterfeit batteries.
If you are using an iRobot battery and have encountered this error, please check the battery contacts and charging contacts by doing the following steps:
- Remove the battery and look for anything that may be obstructing the battery contacts, such as the yellow battery pull tab. To access the battery, refer to the following images for the location of the screws that secures the battery door or bottom cover to the robot.
- Gently wipe the battery contacts with a clean, dampened melamine foam, such as a Magic Eraser.
- Check if there has been any buildup of debris or dirt on the charging contacts of the Home Base and the robot. If any is found, use lightly dampened melamine foam, such as a Magic Eraser, to clean the charging contacts on the Home Base and robot. This has been shown to be a proven method to fully remove debris from the charging contacts.
- Reinstall the battery and replace the bottom cover and battery door, and then place Roomba back on the Home Base to try charging again. If the message persists, contact iRobot Customer Care.
Charging error 6: Battery is too warm
Charging error 6 means your Roomba is not charging because the battery is too warm or hot.
- Let Roomba cool down for at least one hour and try charging again.
- Ensure that Roomba is being charged at room temperature. Do not charge Roomba in an excessively hot environment.
- Ensure Roomba is not charging near a heating vent, baseboard heater, or radiator.
- If the problem persists, please contact iRobot Customer Care.
Charging error 7: Battery is too warm or too cold
Charging error 7 means your Roomba is not charging because the battery is too warm or too cold.
- Let Roomba cool down for at least one hour and try charging again.
- Check that you are using an authentic iRobot Lithium Ion Battery. Charging errors can occur with counterfeit batteries.
- Ensure that Roomba is being charged at room temperature. Do not charge the battery in excessively hot or cold environments.
- Ensure Roomba is not charging near a heating vent, baseboard heater, or radiator.
- If the error persists, please contact iRobot Customer Care.
Charging error 8: Roomba cannot communicate with the lithium ion battery
Charging error 8 means the Roomba cannot communicate with the lithium ion battery.
- Ensure Roomba is being charged at room temperature. Do not charge the battery in excessively hot or cold environments.
- Ensure Roomba is not charging near a heating vent, baseboard heater, or radiator.
- Please remove the edge sweeping brush and bottom cover to access the battery and check that you are using an authentic iRobot Lithium Ion Battery. Charging errors can occur with counterfeit batteries.
If the error persists, contact iRobot Customer Care.
Charging error 9: Lithium ion battery error
Charging error 9 means the Roomba battery is not charging.
Please remove the edge sweeping brush and bottom cover to access the battery and check that you are using an authentic iRobot Lithium Ion Battery. Charging errors can occur with counterfeit batteries.
If you are using an iRobot Lithium Ion Battery and have encountered this error, you may need a replacement battery. Also, please contact iRobot Customer Care.
Charging error 10: Battery cell imbalance
Charging error 10 means there is an imbalance in the cells causing the battery not to charge properly.
You need a new battery. Please buy an authentic iRobot battery in the official store right here.
Charging error 11: Battery cell imbalance
Charging error 11 means there is a communication issue between the battery and robot.
Try the following suggestions to resolve the issue:
- Confirm that your robot has the latest software installed. Connect your robot to your Wi-Fi or Internet and perform an OTA (Over The Air) update.
- Reboot your robot by pressing and holding the CLEAN button for 20 seconds. After releasing the button, the light ring will show a white clockwise swirl while it reboots. The reboot procedure is complete when the light ring shuts off.
- Re-install the battery. Make sure the battery is installed properly on the robot.
If the error persists, please contact iRobot Customer Care.
Charging error 12: Invalid charging load
Charging error 12 means there is an invalid charge load being sent to the battery from the Home Base.
Remove the robot and check for any debris on the Home Base charging contacts. If found, wipe with a clean lightly dampened melamine foam, such as a Magic Eraser to remove the debris from the contacts, then place the robot back onto the Home Base.
If the error persists you may need to purchase a new Home Base. Please visit iRobot Store on Amazon to purchase, or contact iRobot Customer Care for additional assistance.
Charging error 13: Foreign object detected between robot and Home Base
Charging error 13 means there is a foreign object on the charging contacts of the Home Base causing the Roomba to not charge.
Check the Home Base for any debris buildup. If found, wipe it with a clean, lightly dampened melamine foam, such as a Magic Eraser, then place the robot back onto the Home Base.
If the error persists you may need to purchase a new Home Base. Please visit iRobot Store on Amazon to purchase, or contact iRobot Customer Care for additional assistance.
Charging error 14: Internal battery failure
Charging error 14 means there is an internal error with the battery and it will need to be replaced. Please visit iRobot Store on Amazon to purchase, or contact iRobot Customer Care for additional assistance.
Charging error 15: Cell failure during charging
Charging error 15 means there was a cell failure on the battery during charging and the battery will need to be replaced. Please visit iRobot Store on Amazon to purchase, or contact iRobot Customer Care for more help.
Charging error 16: Charging error of Home Base
Charging error 16 means there was a charging failure with the Home Base during charging.
Please visit iRobot Store on Amazon to purchase a Home Base, or contact iRobot Customer Care for help.
Charging error 17: Roomba is not communicating with battery
Charging error 17 means that Roomba is not communicating with the battery.
Please confirm that you are using an authentic iRobot battery. If the message persists, perform a robot reboot. If the message persists after the reboot, please contact iRobot Customer Care.
Charging error 18: Battery communication failure
Charging error 18 means there is a communication issue with the battery and robot.
Simply remove the battery from the robot and then reinstall and place the robot on the Home Base. If the issue persists, please contact iRobot Customer Care.
Charging error 19: Battery charging timeout
Charging error 19 means the battery charged for 240 minutes but timed out before reaching a full charge.
After 240 minutes, the Roomba will automatically battery time out and stop charging to prevent endlessly drawing power and running up your electric bill.
The most likely cause for error 19 is that the battery has not been properly installed, so the power is not reaching the battery. Make sure power is going to the Home Base by checking the power cord connections, both on the wall and on the Home Base. Unplug the connections and plug them back in.
If the error persists, contact iRobot Customer Care for additional assistance.
Charging error 20: Battery not initialized in robot
Charging error 20 means your robot’s battery was not initialized upon charging.
Reinstall your battery to resolve the issue.
If the error persists, contact iRobot Customer Care for additional assistance.
Charging error 21: Battery failure
Charging error 21 means there is charging failure of the battery.
Simply remove the battery from the robot and then reinstall and place the robot on the Home Base. If error persists, please contact iRobot Customer Care.
Charging error 22: Charging system isn't working properly
Charging error 22 means the Roomba charging system isn't working properly.
Simply remove the battery from the robot and then reinstall and place the robot on the Home Base. If error persists, please contact iRobot Customer Care.
Charging error 23: Battery not initialized in robot
Charging error 23 means your Roomba’s charging system is not working properly and the battery was not initialized properly when beginning charging.
Remove the battery from the robot and then reinstall and place back on the Home Base to charge.
If error persists you will need to purchase a new battery. Please visit iRobot Store - Parts and Accessories to purchase a new battery, or contact iRobot Customer Care for additional assistance.
Final Words
And there you have it, the complete Roomba charging error troubleshooting guide.
The best thing you can do to prevent charging errors from happening again is to use the authentic Roomba battery and keep the charging contacts clean of dust and debris.
Other helpful Roomba articles:
