Roomba Error Code Troubleshooting Guide (All Models)
Cleaners Talk is reader-supported. This post contains affiliate links, we may earn a commission at no additional costs to you. As an Amazon Associate we earn from qualifying purchases.
As amazing as Roombas are, they are machines and will inevitably come across an issue. No matter the issue, iRobot has come up with a helpful system of error codes to troubleshoot any problem.
In this post, we share with you the complete Roomba error code troubleshooting guide. No matter the problem, you should be able to find a solution in this comprehensive article.
You can use the quick navigation tab to go to a specific Roomba error code.
IMPORTANT: A Roomba runtime error is different from a Roomba charging error. If your Roomba is experiencing an error while charging, please go to the charging error troubleshooting guide right here.
Roomba Error Code Troubleshooting
A Roomba without Wi-Fi capabilities will stop and tell you something is wrong with a two-tone “uh-oh” sound followed by a narrated voice. Error messages can be repeated by pressing the bumper or the CLEAN button.
A Wi-Fi connected Roomba will display the error in the iRobot HOME App through push notifications. Tap the troubleshooting icon for additional information. Roomba will play a two-tone “uh-oh” sound, followed by a narrated voice. Select models will display a blinking troubleshooting indicator.
The troubleshooting guide below applies to all Roomba models. Newer Roomba models will have more error code possibilities than older versions because they employ better technology.
Please use the information below to troubleshoot a Roomba error code:
Error 1: Roomba is stuck (left wheel)
Error 1 means the Roomba’s left wheel is hanging down or the Roomba is stuck.
If this is the case, lift your robot off the floor, place it in the center of the room, and restart the clean cycle. If this error occurred on a flat surface, check the wheels for obstructions.
Push the wheels up and down several times and shake out any debris that may be trapped in the wheel well.
Gently turn both wheels by hand, making sure they turn freely, and each wheel displays the same amount of resistance. Ensure the Roomba’s wheels are firmly on the floor, then start the Roomba in a new location.
Error 2: Main brushes cannot turn
Error 2 means that the Roomba’s main brushes or extractors cannot turn.
Remove the main brush roller and remove hair and debris that may have accumulated and become tangled. Ensure hair and debris is removed from the square and hex pegs of the extractors as well.
Remove the extractor caps. Ensure any hair or debris that has collected on or underneath the caps, as well as around the metal axles, has been removed. Last but not least, ensure the vacuum path is clear.
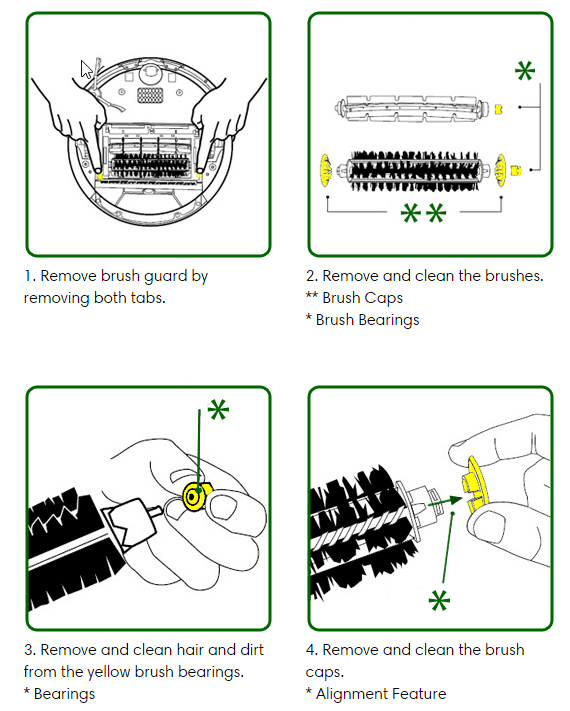
You can also learn the right way on how to clean Roomba brushes right here.
Error 3: Roomba is stuck (right wheel)
Error 3 means the Roomba’s right wheel is hanging down or the Roomba is stuck.
If this is the case, lift your robot off the floor, place it in the center of the room, and restart the clean cycle. If this error occurred on a flat surface, check the wheels for obstructions.
Push the wheels up and down several times and shake out any debris that may be trapped in the wheel well.
Gently turn both wheels by hand, making sure they turn freely, and each wheel displays the same amount of resistance. Ensure the Roomba’s wheels are firmly on the floor, then start the Roomba in a new location.
Error 4: Roomba’s left wheel cannot turn
Error 4 means the Roomba’s left wheel cannot turn. Check the left wheel for obstructions.
Push the wheels up and down several times and shake out any debris that may be trapped in the wheel well.
Gently turn both wheels by hand, making sure they turn freely, and each wheel displays the same amount of resistance. Ensure the Roomba’s wheels are firmly on the floor, then start the Roomba in a new location.
If the wheels cannot be turned by hand or if error persists on flat surfaces when there is no obstacle present, you may need a replacement left wheel module.
Error 5: Roomba’s right wheel cannot turn
Error 5 means the Roomba’s right wheel cannot turn. Check the right wheel for obstructions.
Push the wheels up and down several times and shake out any debris that may be trapped in the wheel well.
Gently turn both wheels by hand, making sure they turn freely, and each wheel displays the same amount of resistance. Ensure the Roomba’s wheels are firmly on the floor, then start the Roomba in a new location.
If the wheels cannot be turned by hand or if error persists on flat surfaces when there is no obstacle present, you may need a replacement right wheel module.
Error 6: Constant cliff detected
Error 6 means the Roomba constantly detects a cliff.
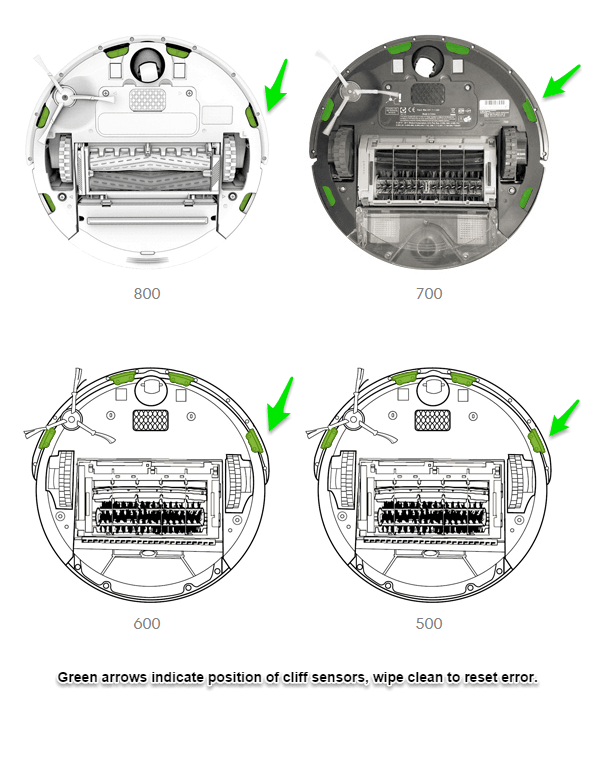
This means that the cliff sensors are dirty, Roomba is stuck, hanging over a cliff, or is on a dark surface. Wipe Roomba’s cliff sensors with a dry cloth, then start Roomba in a new location.
Error 7: Side wheels cannot turn
Error 7 means both of the Roomba’s side wheels are stuck and cannot turn.
Check the wheels for obstructions.
Push the wheels up and down and shake out any loose debris that may be trapped in the wheel well.
Gently turn both wheels by hand and make sure they turn freely and that each wheel displays the same amount of resistance. If a wheel cannot be turned by hand, place your Roomba on the floor and manually push the Roomba backwards and forwards, about >1 ft ( 0.3 m >).
If compressed air is available, gently blow air into the wheel well.
- With its high portability, you can truly use it anywhere. You don’t have to find a plug every time, simply hold the bottom and the high pressure 33000...
- Ready to forget disposal air cans. 10W fast charge (3 hours fully charged) along with 6000mAh rechargeable battery make our new generation duster keep a 30...
- Thin and long nozzle makes it easier to clean corners or place where hand cannot reach. The nozzle is removable for better space utilization. Perfect for...
If the issue still persists, consider rebooting your Roomba.
Error 8: Vacuum has poor suction
Error 8 means the Roomba’s vacuum motor is having problems spinning or the filter is clogged. Most likely, the filter is very dirty causing weak suction on your Roomba.
Perform bin and filter care procedures.
Open the bin door and empty it into the trash. Push down and remove to clean the filter. Tap the filter gently against a trash can. Then, return the filter into the bin and place the bin back in the robot.
The bin should be emptied after each use, while the filter should be replaced every two months.
You can also learn more about how to clean a Roomba filter based on the model.
Error 9: Bumper is stuck
Error 9 means the Roomba’s bumper is stuck and is not moving freely.
Gently tap the bumper several times to dislodge any debris that may be trapped underneath, and then press the button to restart. It is also possible that during cleaning the bumper became dislodged from the robot. If so, please go to the dislodged bumper to properly align the bumper into the robot.
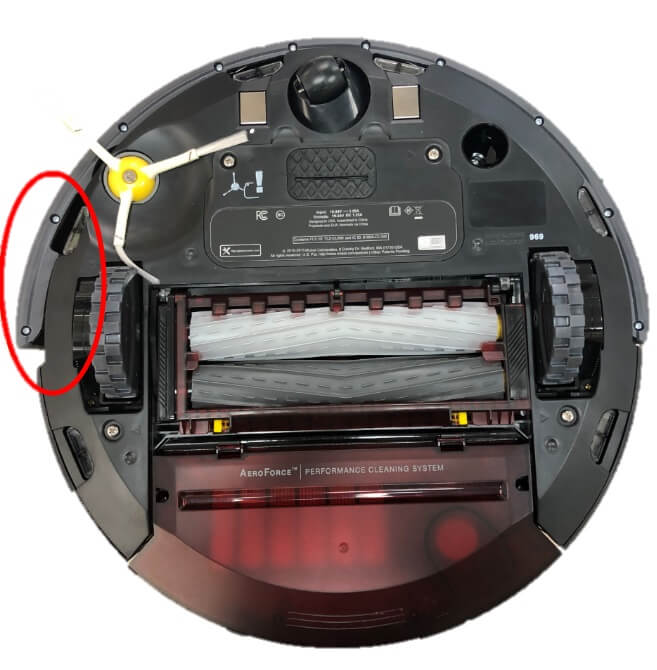
Dislodged bumper.
Correct bumper orientation.
A stuck bumper is the main cause why your Roomba may be running around in circles.
Error 10: Side wheels cannot turn
Error 10 means the Roomba’s side wheels are stuck or its bumper is not registering obstacles.
If the Roomba is circling in place, clean the Roomba's side wheels of hair and debris. Push them in and out and confirm that they both turn. If not circling in place, Roomba may be in an extremely large room. Use a Virtual Wall to create a smaller cleaning area.
Push the wheels up and down several times and shake out any debris that may be trapped in the wheel well.
Gently turn both wheels by hand, making sure they turn freely, and each wheel displays the same amount of resistance. Ensure the Roomba’s wheels are firmly on the floor, then start the Roomba in a new location.
Error 11: Insufficient air flow
Error 11 means the Roomba is experiencing insufficient airflow.
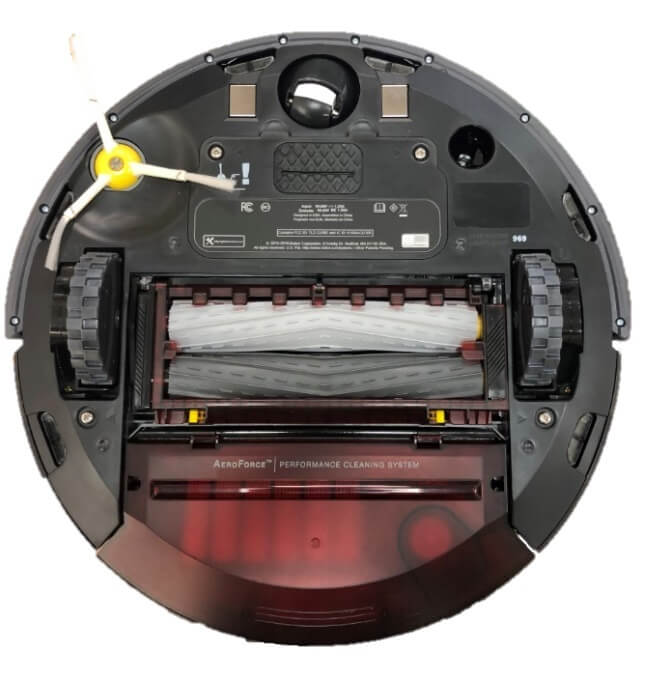
This is often caused by an internal error or the vacuum in the bin is not functioning properly. If you have a Roomba 800 or 900 Series, you may need a replacement AeroForce™ bin. You may also contact iRobot Customer Care for more information.
AeroForce Bin Box
- Hepa filter dust collection box BOX filter box collector is suitable for iRobot Roomba 800 900 Series Bin series 870 860 880 885 960 robot vacuum cleaner...
- Aerovac dust bin - includes filter, installed
- Holds 60% more dirt than previous Roomba generations
Remove the cleaning head module by following the instructions right here.
Next, inspect the fan/scroll/vacuum assembly for debris. Be sure to inspect both the entrance and exhaust. Remove any debris using compressed air, then replace the bin filter.
You may also need a replacement cleaning head system.
- Upgraded Version
- Enhanced Cleaning Head
- Replacement Part Compatible with: iRobot Roomba 527 510 520 530 535 550 551 529 601 602 527e 595 620 630 650 660 655 760 770 780 790
Error 12: Stuck over an edge
Error 12 means the Roomba is stuck over an edge, is on a threshold, or is on a dark surface.
Move the Roomba to a new location then press the button to restart. If this does not resolve the issue, the floor tracking sensor may be dirty. Wipe them with a clean, dry cloth or a melamine foam, like a Magic Eraser.
- The Mr. Clean Magic Eraser kitchen scrubber with Dawn removes 3x more greasy kitchen mess per Swipe than the leading all-purpose bleach Spray Cleaner
- This cleaning scrubber is tough on dirt all around the house. Great for tough kitchen messes: grease on ceramic cookware, burnt-on messes on glass...
- Dual sided cleaning with the grease fighting power of Dawn.
Error 13: Both wheels on uneven surface
Error 13 means the Roomba is on an obstacle or an uneven surface and a side wheel is stuck.
If this is the case, lift your robot off the floor, place it in the center of the room and restart the clean cycle. If this error occurred on a flat surface, check the wheels for obstructions.
Push the wheels up and down several times and shake out any debris that may be trapped in the wheel well.
Gently turn both wheels by hand, making sure they turn freely, and each wheel displays the same amount of resistance. Ensure the Roomba’s wheels are firmly on the floor, then start the Roomba in a new location.
Inspect the front caster wheel on the robot to ensure it is free of any debris.
Error 14: Roomba does not detect bin
Error 14 means the Roomba is not detecting an installed bin or the bin has a bad connection to the robot.
If this is the case, confirm the filter and the bin are installed properly.
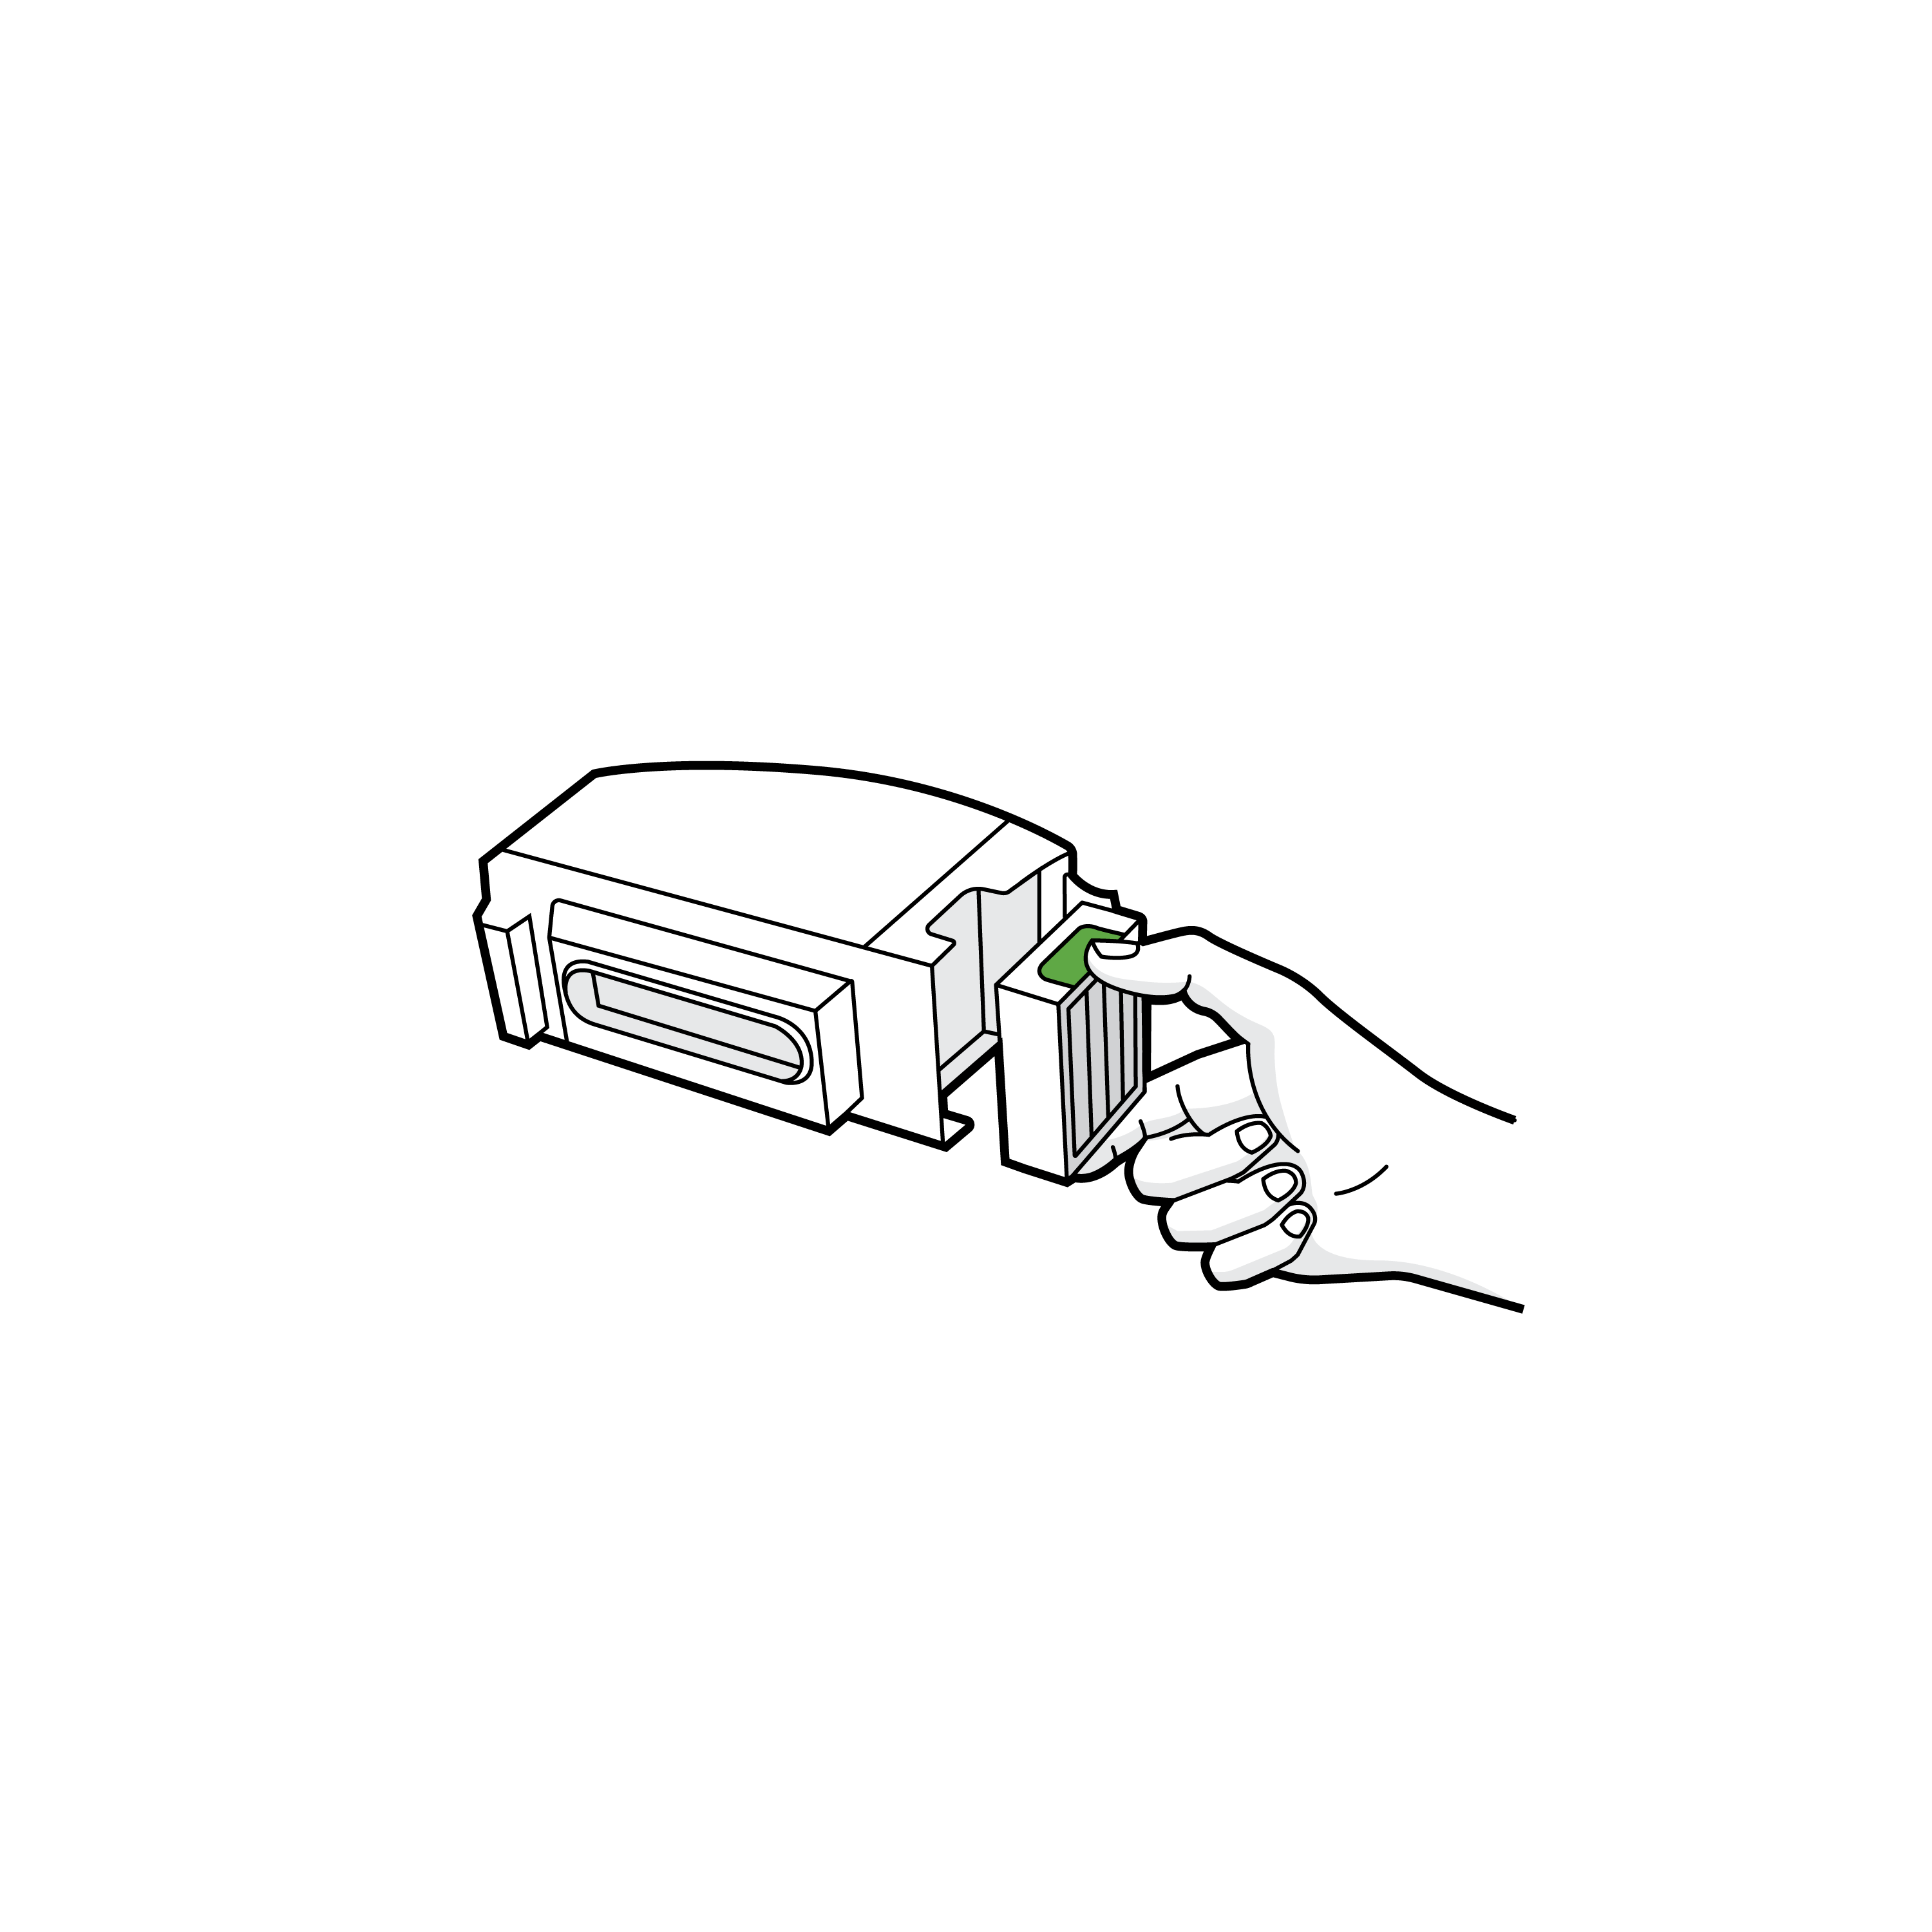
Remove and reinstall the bin to ensure a good connection. Please check the metal bin contacts and wipe them on both the robot and the bin with a clean, dry cloth.
Error 15: Internal board error
Error 15 means the Roomba is experiencing internal board error.
This error happens only to Roomba models with smart maps and can happen periodically. A few things can trigger it. Often, Error 15 means your robot experienced an internal error and was able to take care of itself. It's just letting you know about that afterwards.
For example, if the battery is removed and then reinserted into your robot, upon power up, your robot will signal Error 15 (this is expected behavior, and there is nothing wrong with your robot).
However, if Error 15 is happening on every cleaning job, and is interfering with your ability to use the Roomba, you can try the following troubleshooting steps:
- First, revert your Smart Map to a previous version by going into your History and viewing your Clean Map reports. At this point, simply find a map you like from a previous cleaning job and select the overflow menu in the top right corner. Select "Update Smart Maps" to complete this process.
- If the error persists, try remapping your home by deleting all of your Smart Maps and starting a new one. You can do so by viewing the maps you'd like to delete, tapping the three (3) horizontal dots icon, and then choosing "Delete map".
- At this point, you can try rebooting your robot. To do so, press and hold its button for 9 seconds, and then release it. The light ring will then swirl clockwise in white. This swirling pattern, which can last for up to a minute and a half, means that your robot is booting up. The reboot procedure is complete when the light ring shuts off.
- If none of these steps work and Error 15 persists, you can perform a full factory reset. You can learn how to perform the correct factory reset right here.
Error 16: Roomba is tilted or the bumper is dislodged
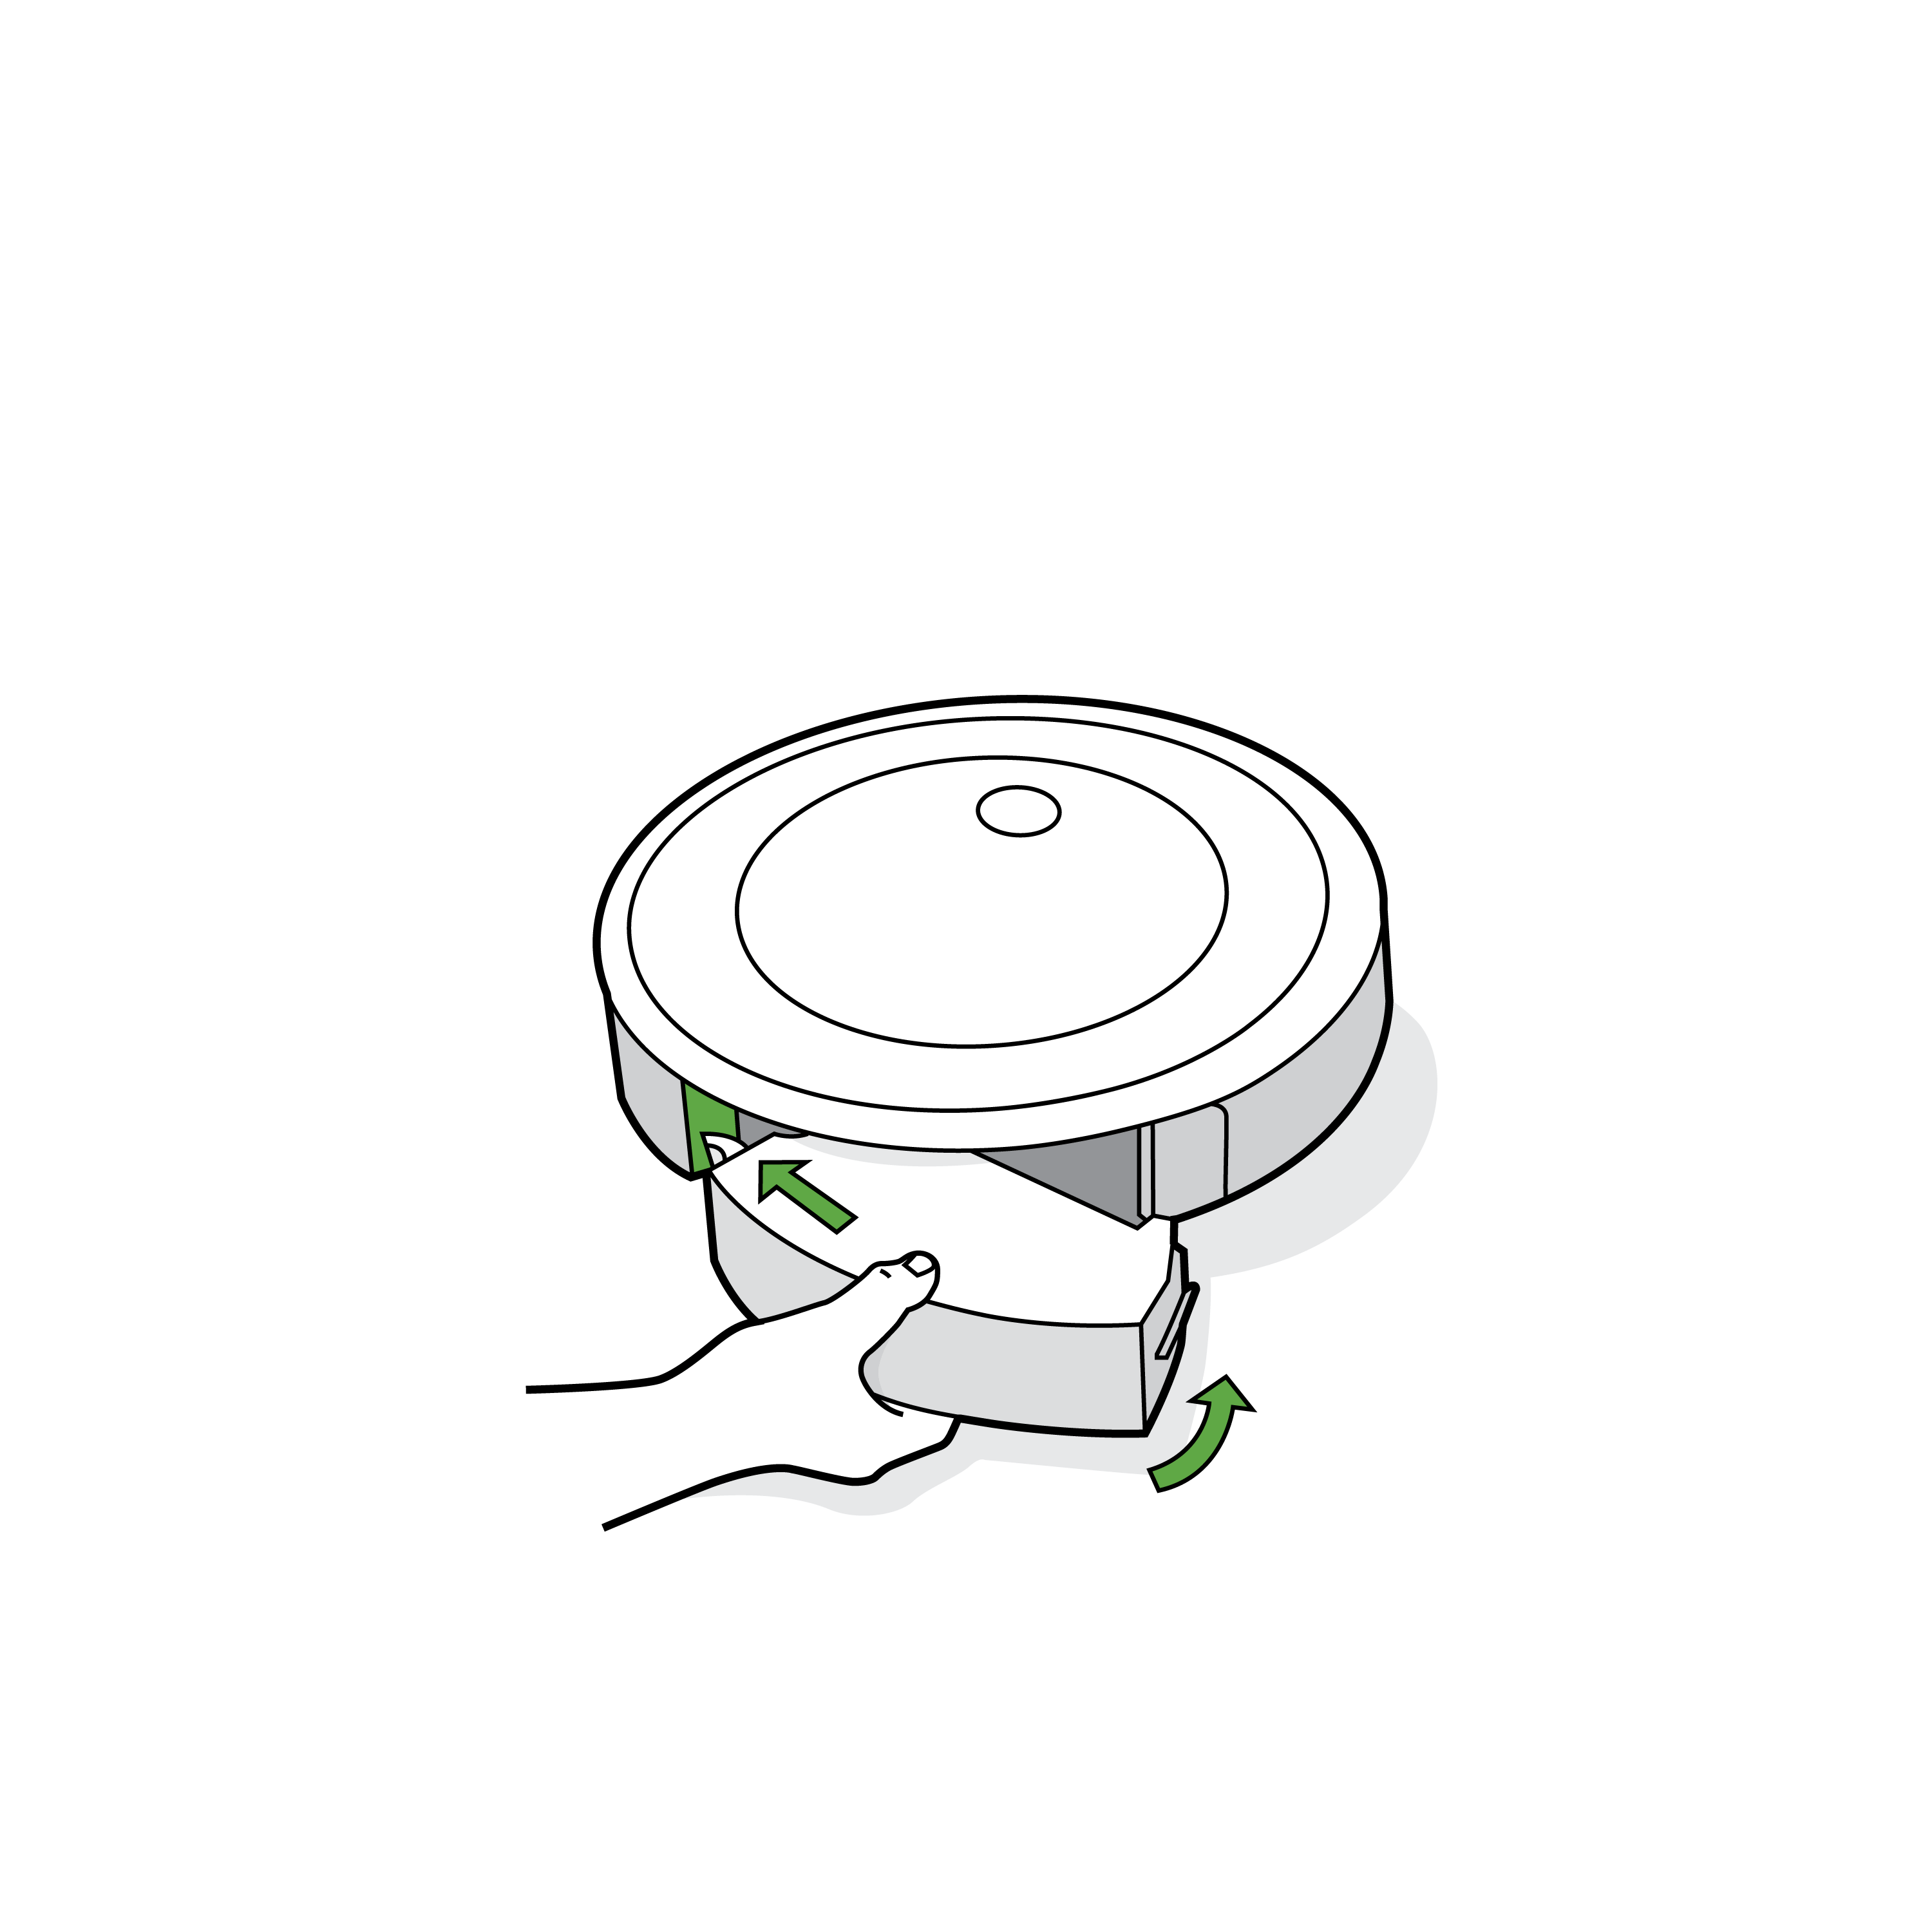
Error 16 means the Roomba is not able to start cleaning because it is tilted or the bumper is possibly dislodged from the robot. If the bumper is dislodged, push the bottom of the bumper in this area in, and up towards the top of the robot. You will hear a click when it snaps back into place.

Dislodged bumper.

Correct bumper orientation.
After, the bottom of the bumper is in place, press the top of the bumper in the dislodged area in and down towards the bottom of the robot. You will hear a click when it snaps back into place.
Tap on the bumper to ensure it moves freely.
If the bumper is not dislodged from the robot, move the Roomba to a flat surface then press the Clean button to restart. Avoid moving the robot when pressing the button.
If the Roomba says this message on a flat surface, reboot the robot.
Error 17: Navigation problem
Error 17 means the Roomba has entered an unknown area and got lost while cleaning and unable to return to Home Base. It can also mean the Roomba cannot complete and has cancelled its cleaning job.
Here’s how to troubleshoot error 17:
- Ensure there were no changes to the environment during the cleaning cycle like a closed door or moved furniture.
- The space is too large to be completed in a single cleaning run.
- The carpet to be cleaned is too thick.
- It is possible for a Roomba to drive over transitions, such as doorway thresholds, that it cannot drive over again when trying to leave the area.
- Ensure the house has adequate light (daylight or dim lighting should be sufficient) for Roomba to navigate. Extremely dark rooms can obscure the localization camera and cause problems with navigation and coverage.
- Excessive clutter can contribute to this error. Clear any cluttered areas.
- Ensure the camera is clear of any dust or debris. Wipe the clear window using a microfiber or soft cotton cloth that has been lightly dampened with water or a screen cleaning solution.
- There may be debris on the Floor Tracking Sensor. Turn the Roomba over and use a clean, dry microfiber or soft cotton cloth to wipe any debris that has accumulated in the round Floor Tracking Sensor opening on the right side of the bottom surface. Do not spray cleaning solution directly into the sensor opening.
- There is an issue with the robot (e.g., a loose caster wheel) which requires maintenance.
Error 18: Docking problem
Error 18 means the cleaning is complete, but the Roomba was unable to dock onto the Home Base. Put simply, Roomba cannot return to the Home Base or starting position.
Please check the Home Base and charging contacts, then do the following:
- Ensure the Home Base did not get unplugged, moved, or rotated during the cleaning cycle.
- The charging contacts on both the Home Base and robot should be clear of residue or debris. Use a clean lightly dampened melamine foam such as a Magic Eraser to remove any residue or debris that may have built up. The power indicator on the Home Base will illuminate when your Roomba is charging.
- Use a clean dry cloth to clean the front facing camera, and the Visual Docking Target on the Clean Base or Home Base.
- Ensure there is no clutter around or near the Home Base.
- The position of the Home Base is on a hard, level surface against a wall. Your Roomba should have a clear path to the Home Base and the Home Base should be at least 4 ft (1.2 m) from any stairs.
- Ensure there are no obstructions (e.g., stickers, tape, or paint) on the bumper or on the Home Base.
- Please check if Your Roomba can detect the Home Base.
- If your Roomba is not starting on a Home Base, ensure there are no obstacles in front of the starting position. This will prevent Your Roomba from being able to return to the original starting position when the cleaning cycle is complete.
Error 19: Undocking problem
Error 19 means your Roomba is experiencing an issue undocking from the Home Base. Clear any obstacles that may be in front or around the Home Base, then press the button.
If the message persists, please perform a reboot on the Roomba and the Home Base, then start your Roomba from the Home Base. Environmental interference may prevent your Roomba from navigating as expected.
If the issue persists, try to start Roomba off the Home Base. Doing so may cause Roomba to provide a different Error Message. Use the to troubleshoot the Error Roomba presents.
Error 20: Internal communication error
Error 20 means your Roomba is experiencing an internal communication error. Press the button to restart the cleaning mission. If the message persists, perform a reboot.
Error 21: Lost communication with mobility board
Error 21 means your Roomba is experiencing an internal communication error. More specifically, Roomba has lost communication with its mobility board.
Press the button to restart the cleaning mission. If the message persists, perform a reboot.
For this error, it is best to contact iRobot Customer Care.
Error 22: Roomba is stuck
Error 22 means your Roomba is stuck. It will produce the message “Move to a new area then press the button”.
If your Roomba gives this error when it is stuck under an obstacle, move your Roomba to a new location and press the button to restart. Check the side wheels for obstructions.
Push the wheels up and down several times and shake out any debris that may be trapped in the wheel well.
Gently turn both wheels by hand, making sure they turn freely, and each wheel displays the same amount of resistance. Ensure the Roomba’s wheels are firmly on the floor, then start the Roomba in a new location.
Error 23: Battery authentication failure
Error 23 means Roomba is not communicating with the battery.
Please confirm that you are using an authentic iRobot battery. If you need a new replacement battery, you can browse an authentic battery based on the model.
- Up to 3 hours run time dry sweeping or up to 2 hours run time wet mopping
- Charges in approximately 10-12 hourse with Braava 320
- Nickel Metal Hydride 1500mAh
Error 24: Wheels are spinning but Roomba is not moving
Error 24 means your Roomba is on an obstacle or an uneven surface and the wheels are spinning, but the robot is not moving. If this is the case, lift Your Roomba off the floor, place it in the center of the room and restart the clean cycle.
If this error occurred on a flat surface, check the wheels for obstructions.
Push the wheels up and down several times and shake out any debris that may be trapped in the wheel well.
Gently turn both wheels by hand, making sure they turn freely, and each wheel displays the same amount of resistance. Ensure the Roomba’s wheels are firmly on the floor, then start the Roomba in a new location.
Error 25: Internal communication error
Error 25 means your Roomba is experiencing an internal communication error. Press the button to restart the cleaning mission. If the message persists, perform a Roomba reboot.
If the message persists after rebooting the Roomba, please contact iRobot Customer Care.
Error 26: Vacuum stall, filter clog possible
Error 26 means the Roomba’s vacuum is experiencing insufficient airflow.
Begin by removing the Cleaning Head Module. Next, inspect the fan/scroll/vacuum assembly for debris. Be sure to inspect both the entrance and exhaust.
Remove any debris using compressed air, then replace the Bin Filter.
Error 27: Vacuum motor over-temperature
Error 27 means the Roomba vacuum is not functioning due to over-temperature, often caused by a clogged filter or bad impeller of the vacuum motor. You may also need a replacement cleaning head system.
Begin by removing the Cleaning Head Module. Next, inspect the fan/scroll/vacuum assembly for debris. Be sure to inspect both the entrance and exhaust.
Remove any debris using compressed air, then replace the Bin Filter.
Error 29: Error while upgrading software
Error 29 means that your Roomba experienced an error while upgrading its software. This is caused by the Roomba starting a cleaning run while a software update was being performed.
Place your Roomba on the Home Base for the software update to process fully.
If the robot has been on the Home Base for an extended period of time and the white light ring starts to swirl around the button, this also will let you know an update is in progress.
White clockwise swirl: Starting up or updating software (please wait).
Error 30: Vacuum failed to start
Error 30 means your Roomba’s vacuum motor is having problems spinning or the filter is clogged. Perform bin and filter care procedures.
Open the bin door and empty it into the trash. Push down and remove to clean the filter. Tap the filter gently against a trash can. Then, return the filter into the bin and place the bin back in the robot.
The bin should be emptied after each use, while the filter should be replaced every two months.
Error 32: Smart Map on robot does not match map saved on App
Error 32 means that the Smart Map your robot created does not match with the map in the iRobot HOME App.
Please review the iRobot HOME app Smart Map section to ensure no changes have been made to the map and then try again. If the message persists, perform a robot reboot by pressing and holding the button for nine (9) seconds. Then ask the robot to clean everywhere/clean all.
If the message persists after rebooting the robot, please contact iRobot Customer Care.
Error 33: Path may be blocked
Error 33 means your Roomba cannot complete cleaning and has cancelled its cleaning job because its path may be blocked. Please do the following:
- Ensure there were no changes to the environment during the cleaning cycle (i.e. closed door, moved furniture).
- It is possible for your Roomba to drive over transitions, such as doorway thresholds, that it cannot drive over again to leave the area.
- Ensure the house has enough light (daylight or dim lighting is sufficient) for your Roomba to navigate. Extremely dark rooms could obscure the localization camera and cause problems with navigation and coverage.
- Excessive clutter could contribute to this error. Clear cluttered areas.
- Ensure the camera is clear of any dust or debris. Wipe the clear window on the top surface using a microfiber cloth that has been lightly dampened with water or a screen cleaning solution.
Error 34: Internal communication error
Error 34 means your Roomba is experiencing an internal communication error. Press the button to restart the cleaning mission. If the message persists, perform a robot reboot.
If the message persists after rebooting the robot, please contact iRobot Customer Care.
Error 36: Bin full sensor not cleared
Error 36 means that the Bin Full sensor for your Roomba Is not cleared when the robot evacuated debris into the Clean Base. You may also see a red light ring sweeping towards the rear of the robot.
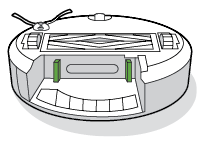
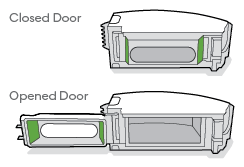
Ensure the bin full sensors on the robot cleaning head and bin have been cleaned off. To do so, remove the filter from the bin, rinse the bin and bin door with water, and let them air dry. Wipe the Bin Full sensors on the robot with a clean, lightly dampened melamine foam such as a Magic Eraser.
Error 38: Power communication issue
Error 38 means your Roomba is experiencing an internal communication error. Press the button to restart the cleaning mission. If the message persists, perform a robot reboot.
If the message persists after rebooting the robot, please contact iRobot Customer Care.
Error 39: Power communication issue
Error 39 means your Roomba is experiencing an internal communication error. Press the button to restart the cleaning mission. If the message persists, perform a robot reboot.
If the message persists after rebooting the robot, please contact iRobot Customer Care.
Error 41: Mission timed out before completion
Error 41 means your Roomba timed out during a cleaning mission.
This error could occur due to the following reasons:
- The cleaning job took too long for your Roomba to complete and the robot did not pause or perform a recharge and resume cycle. This could happen if the robot ran over four (4) hours without either occurring. Please place Roomba back onto the Home Base to let the robot charge, and then attempt another cleaning job.
- Roomba reached the limit for the room size area it is able to cover during a cleaning job. The robot can cover a certain area on one level of the home. If this happens, place the robot and Home Base into the area of the home where the robot is unable to reach and start a new cleaning mission. Doing so you can also create and eventually save a new map for that area. Anytime it is desired for the robot to clean this area of the home, the robot will need to be moved and fully charged.
- The robot did not perform any wall following within 15 minutes of beginning the cleaning job. Ensure the robot is navigating around the home as intended and not stuck in an area such as under a table with multiple chairs.
- The robot did not perform edge cleaning within the duration of the cleaning job with edge cleaning activated in the iRobot HOME App. Ensure the robot is navigating around the home as intended and not trapped in a tight space such as under a table with multiple chairs.
Error 42: Failed to re-localize when direct cleaning
Error 42 means that your Roomba failed to re-localize during a direct cleaning job using Smart Maps and the map may also appear to not look correct in the app.
This error could occur due to the following reasons:
- Changes to the environment during the cleaning cycle (i.e. closed door, moved furniture).
- It is possible for the Roomba to drive over transitions, such as doorway thresholds, that it cannot drive over again to leave the area.
- Not enough adequate lighting (daylight or dim lighting is sufficient) for Roomba to navigate. Extremely dark rooms could obscure the localization camera and cause problems with navigation.
- Excessive clutter could contribute to this error. Clear cluttered areas.
- Camera covered with dust or debris. If so, wipe the clear window on the top surface using a microfiber or cloth that has been lightly dampened with water or a screen cleaning solution.
- Roomba was picked up and moved to another location while cleaning.
Please ensure there were no changes or edits to your Smart Map. Place your Roomba back onto the Home Base and attempt another direct cleaning job.
Error 43: Roomba started in Home Base Keep Out Zone
Error 43 means your Roomba started a job in a Keep-out Zone.
The robot places a small keep-out zone around the Home Base by default. Move your Roomba to a new location, then press the CLEAN button to restart the mission.
Error 46: Robot ended mission with low battery not on dock
Error 46 means that your Roomba's battery is low and needs to charge. Place your Roomba on the Home Base until fully charged. You can use the iRobot HOME app to view charging status.
Error 47: Invalid robot calibration
Error 47 means your Roomba is experiencing an internal error.
A robot reboot should resolve this issue. If the error persists, please contact iRobot Customer Care.
Error 48: Invalid robot calibration (Roomba’s path)
Error 48 means your Roomba’s path is not properly calibrated.
If your Roomba says "couldn't get to the room you asked it to clean. Please clear the path and try again." Please make sure there are no obstacles that are preventing Roomba from navigating from room to room within the cleaning area.
Ensure that the Imprint™ Smart Map looks like your cleaning area and that all desired cleaning areas are connected within the Smart Map.
Error 66: Memory limit reached
Error 66 means your Roomba has run out of memory during a cleaning mission.
You may see the robot return to its Home Base and reboot itself.
The Light Ring will swirl white and the robot will beep. If this occurs, ensure that your robot is provisioned to the iRobot HOME App before starting a cleaning job. Please go to Setting up your Wi-Fi Connected Robot with the iRobot HOME App to connect to the app.
Once your robot is connected to the app, as your robot maps out space in your home it is continually adding information to its memory. If the space the robot is mapping out is too large for the robot's memory, the robot will eventually run out of memory, head back to the home base and then report this error message.
The robot will then automatically reboot while on the home base to clear the memory.
If your robot continues with this error after rebooting, perform the following steps:
- Create a new Smart Map with smaller sections of the house and use directed room cleaning only once the map is saved.
- If multiple maps are saved in the app, delete any unused maps as this will free up memory.
If the robot does not perform an automatic reboot after docking onto the Home Base, please reboot the robot manually. If the message persists, please contact iRobot Customer Care.
Error 68: Camera failed during cleaning job
Error 68 means an error occurred with the Roomba’s camera during cleaning.
If your Roomba reports an error 68, this means the robot is not receiving data from the camera which will cause the robot to not navigate your home properly.
Should this error occur, place the robot back onto the home base and perform a robot reboot; this should clear the error and you will be able to perform another cleaning job.
If the message persists, please contact iRobot Customer Care.
Error 74: Area limit cleaned reached
Error 74 means your Roomba has stopped during a cleaning mission because it has reached the limit for the maximum area it can cover during a cleaning job.
This can happen because the Roomba can cover a certain area on one level of the home.
Also, the area covered is dependent upon a few factors including flooring type and furniture.
If you receive this error, place the Roomba and the Home Base in the area of the home where the robot was unable to reach. Start a new cleaning mission.
If error 74 continues after relocating your Roomba, perform a reboot to clear the error. If the message persists after the reboot, contact iRobot Customer Care.
If you own a Roomba with Imprint™ Smart Mapping capabilities, you have options for creating and saving a new map for that area, and for replacing a Smart Map with a recent Clean Map. Anytime it is desired for the robot to clean this area of the home, the robot will need to be moved and fully charged.
Error 75: Stuck around obstacles
Error 75 means your Roomba timed out during a cleaning mission because it is stuck around obstacles.
This can happen because the Roomba did not perform any wall following within 15 minutes of beginning the cleaning job. Ensure the robot is navigating around the home as intended and not stuck in an area such as under a table with multiple chairs. Perform robot reboot if issue persists after relocating your robot.
Error 88: Roomba cannot safely move backwards
Error 88 means your Roomba has determined it can no longer safely back up (reverse).
The error occurs on a Roomba that is not equipped with rear cliff sensors when it is unable to back up any further due to a perceived safety issue. There is a limited distance that the robot can safely back up to ensure it does not fall backward down a cliff.
The error can also occur if the Roomba gets stuck on a threshold, hung up near a chair, or gets into a situation where the bumper is hit when it does see an actual cliff.
Spinning in place depletes the amount of distance that the robot can back up.
To solve this error, move the Roomba to a new nearby location and press the button to resume the mission.
Error 89: Mission runtime too long
Error 89 means the Roomba was not able to complete the cleaning mission within a reasonable period of time and returned to the dock. Most Roombas will run a cleaning mission, with charge and resume occurring as needed, for up to 12 hours to clean.
If the cleaning time during a mission exceeds the Roomba’s limitations, it will return to its dock.
To solve this issue, check for obstacles that could be interfering with the Roomba’s ability to efficiently clean the space; remove and retry. Use cleaning zones to divide the space into smaller sections and run multiple cleaning missions. If the message persists, please contact iRobot Customer Care.
Error 1003: Internal communication error
Error 1003 means Roomba is experiencing an internal communication error. Press the button to restart the cleaning mission. If the problem persists, perform a robot reboot.
If the message persists after rebooting the robot, please contact iRobot Customer Care.
To solve this issue, check for obstacles that could be interfering with the Roomba’s ability to efficiently clean the space; remove and retry. Use cleaning zones to divide the space into smaller sections and run multiple cleaning missions. If the message persists, please contact iRobot Customer Care.
Final Words
And there you have it, the complete Roomba error code troubleshooting guide.
We are grateful for the manufacturer of Roomba, iRobot, to have created such a simple system for Roomba owners to troubleshoot issues using its error codes. Remember, if you are unable to resolve an issue, don’t hesitate to contact iRobot Customer Care.
Other helpful Roomba articles:


