Roborock Not Charging? Here’s the Easy Solution
Cleaners Talk is reader-supported. This post contains affiliate links, we may earn a commission at no additional costs to you. As an Amazon Associate we earn from qualifying purchases.
Roborock offers some of the most unique robot vacuums on the market, combining vacuuming and mopping functions on their robots. However, sometimes their robots can encounter a charging issue.
So, why is your Roborock not charging?
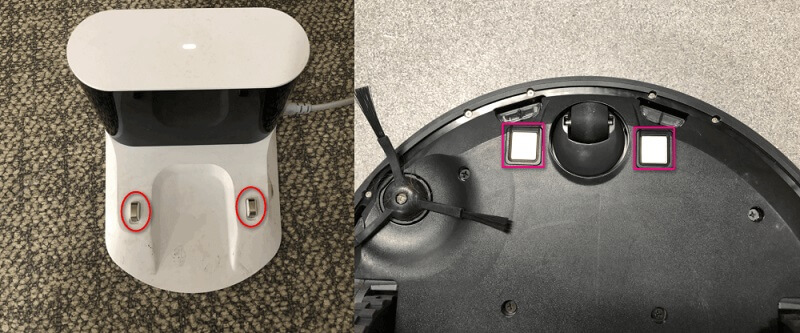
The most common reason why a Roborock is not charging is due to a poor connection between the charging contacts on the robot and the charging base pins caused by an accumulation of dust. Wipe the charging contacts both on the charging base and under the robot with a clean, dry cloth.
That being said, there are a total of 5 possible reasons why your Roborock is not charging. In this post, we provide a solution for each cause. By the end of this post, your Roborock should charge normally.
5 Reasons Why Your Roborock Is Not Charging
There are 5 possible reasons why your Roborock is not charging. It could be that the charging contacts are dirty, the charging contacts are not lining up correctly, the charging base is no longer working, the battery is no longer able to hold a charge, or the motherboard has a damaged component.
Here are the 5 reasons explained in detail, along with the solutions:
1. Dirty charging contacts
By far, the most common reason why a Roborock is not charging is due to dirty charging contacts. As your robot moves around your house, dust and debris will inevitably linger on the underside of the robot.
When the charging contacts on the robot are dirty, they cannot make a clean connection with the pins on the charging base, hindering the flow of electrical current that would charge the robot.
Dirty sensors and charging contacts will produce an error 13 or 22.
Solution: Wipe the charging contacts on the robot and charging base

All you have to do to fix this issue is to wipe the charging contacts both on the charging base and under the robot. If you have been using your Roborock for some time, make sure they have not been corroded.
There are half a dozen or so sensors on the bottom to clean. Plus the two large sensors (one on front side and one on side). You also need to wipe off the LIDAR bump sensors and all around the circumference of the sides.
Ideally, you need to use a damp cloth to remove the stubborn accumulation of dirt from the robot. You can also use a Magic Eraser (link to Amazon) to effortlessly clean the sensors.
2. Charging contacts not lining up correctly
Another reason for a Roborock not charging is because the charging contacts on the robot and the charging base are not lining up correctly. Do you notice it not charging after making an adjustment (i.e. repositioning on charge port)? Is there anything potentially blocking it on the port?
Solution: Remove the mop when charging
You probably need to run a few tests starting up a session and then sending it back to port to see if it's lining up correctly when it tries to dock. Could be as simple as an ergonomic fix.
However, the most common reason why the charging contacts do not line up properly is probably because you leave the mop on the robot when it is charging. The mop pad elevates the robot a few millimeters and the Roborock detects that it's charging but it doesn't actually charge.
It is wise to remove the Roborock’s mop before charging. Not only does this ensure a proper charge, but it will also prevent the robot from developing an unpleasant odor because of the damp mop.
3. The charging base is no longer working
If you have wiped the charging contacts on both the robot and the charging base, but your Roborock is still not charging, it could be that the charging base is no longer working.
Solution: Replace the charging base
Please check if the charging base is working or not.
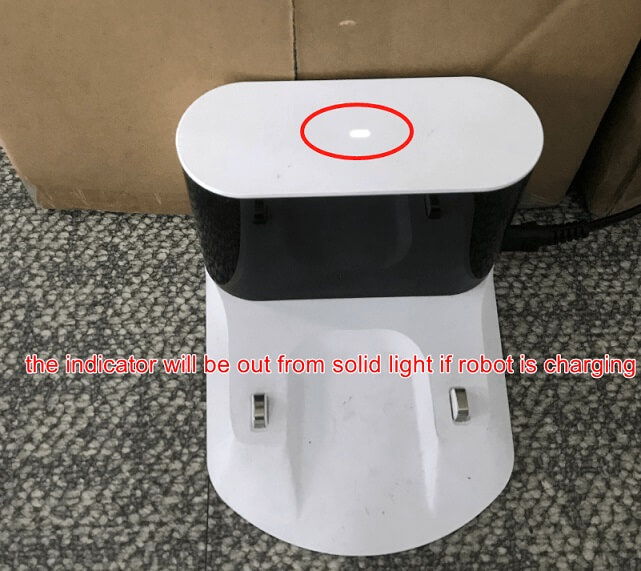
The indicator light on top of the charging base should be solid on without the robot and off with the robot placed on it. Confirm if the cable and the slot of the charging base are well connected.

Please push the cable head into the slot at the bottom of the base very hard. Also you can change another wall outlet to have a try. If the charging base is no longer working, you need to replace it.
4. The battery is no longer able to hold a charge
A Roborock robot vacuum cleaner runs on a Lithium-ion battery, which has a limited lifespan. On average, a Lithium-ion battery lasts about two to three years or 300 to 500 charge cycles, whichever occurs first. One charge cycle is a period of use from fully charged, to fully discharged, and fully recharged again.
Solution: Replace the battery
If your Roborock is no longer able to hold a charge after 2 or 3 years, it means that the battery has run its course and needs a replacement. You can simply buy a replacement on Roborock’s website.
5. Damaged motherboard
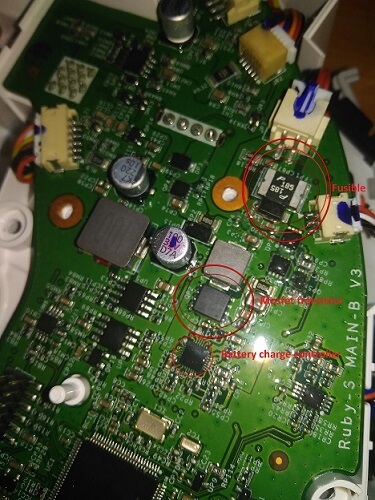
Last but not least, a Roborock may not charge if the motherboard is damaged. On some of the Roborock models, the S5 (non-max) in particular, this is a very well documented problem. The capacitor on the charging circuit of the main board burns out over time, rendering incoming current insufficient to charge the robot.

Solution: Change the motherboard or get a replacement
If the motherboard is damaged, you have three options:
- Replace the defective component of the motherboard
- Replace the entire motherboard
- Contact Roborock for a replacement
If you are a skilled electrician and want to go the DIY route, replacing the defective component of the motherboard is the most inexpensive solution, assuming you know which part to replace.
Three components that are most likely to be affected in order of probability are:
- Resettable fuse « P185 » : PTC resettable fuse (SMD2920P185TF)
- Mosfet transistor « B09N03 » (EMB09N03H) or « B09A03 » (EMB09A03HP) (2 different versions depending on the motherboards)
- Battery charger controller MAX8731A (MAX8731AETI+) or BQ24773 (ref BQ24773RUYT) (2 different versions depending on the motherboards)
In most cases, the P185 fuse is by far the most probable cause of the charging failure.
If you don’t want to go through the hassle of figuring out which component is causing the problem, you can also choose to replace the entire motherboard. However, both options require you to disassemble the Roborock and void the warranty, without any guarantee of your robot working again.
The safest option, and one we recommend is to contact customer support and tell them that there may be an issue with the motherboard which causes a charging failure. Save yourself the time and contact them. They would be more than happy to help you find a solution to your problem.
FAQ on Roborock Charging
Below are some of the most frequently asked questions surrounding a Roborock’s battery and its charging procedure. We will always add new questions to the list so you may want to bookmark this page.
1. How long does Roborock take to charge?
On average, it takes between 210 to 360 minutes to charge a Roborock from 0% to 100% depending on the model. It is recommended that you cool down the robot for 30 minutes before charging.
Here is the charging time for each Roborock model:
- Roborock C10 - 210 minutes charging time
- Roborock E2/E3 - 210 minutes charging time
- Roborock E4 - 360 minutes charging time
- Roborock S5 - 220 minutes charging time
- Roborock S6 - 220 minutes charging time
- Roborock S4 - 220 minutes charging time
- Roborock S5 Max - 360 minutes charging time
- Roborock S6 Pure - 360 minutes charging time
- Roborock S6 MaxV - 360 minutes charging time
- Roborock S7 - 360 minutes charging time
2. How do I know if my Roborock is charging?
A Roborock is charging when the power indicator light on the robot is flashing. The indicator light on top of the charging base should be solid on without the robot and off with the robot placed on it.
3. How long does a Roborock battery last?
On average, a Roborock battery lasts about 180 minutes, although it lasts for about 150 minutes in normal mode. The battery lifespan lasts about 2 to 3 years, or about 300 to 500 charge cycles.
4. Can Roborock overcharge?
After your Roborock is completely charged, it will switch to a low current complementary charging mode. This will prevent overcharging. However, if you are not planning to use your Roborock for a long time, it is recommended to turn off the Roborock and store it for safety.
Related articles:
