How to Use McCulloch MC1275 Canister Steam Cleaner
Cleaners Talk is reader-supported. This post contains affiliate links, we may earn a commission at no additional costs to you. As an Amazon Associate we earn from qualifying purchases.
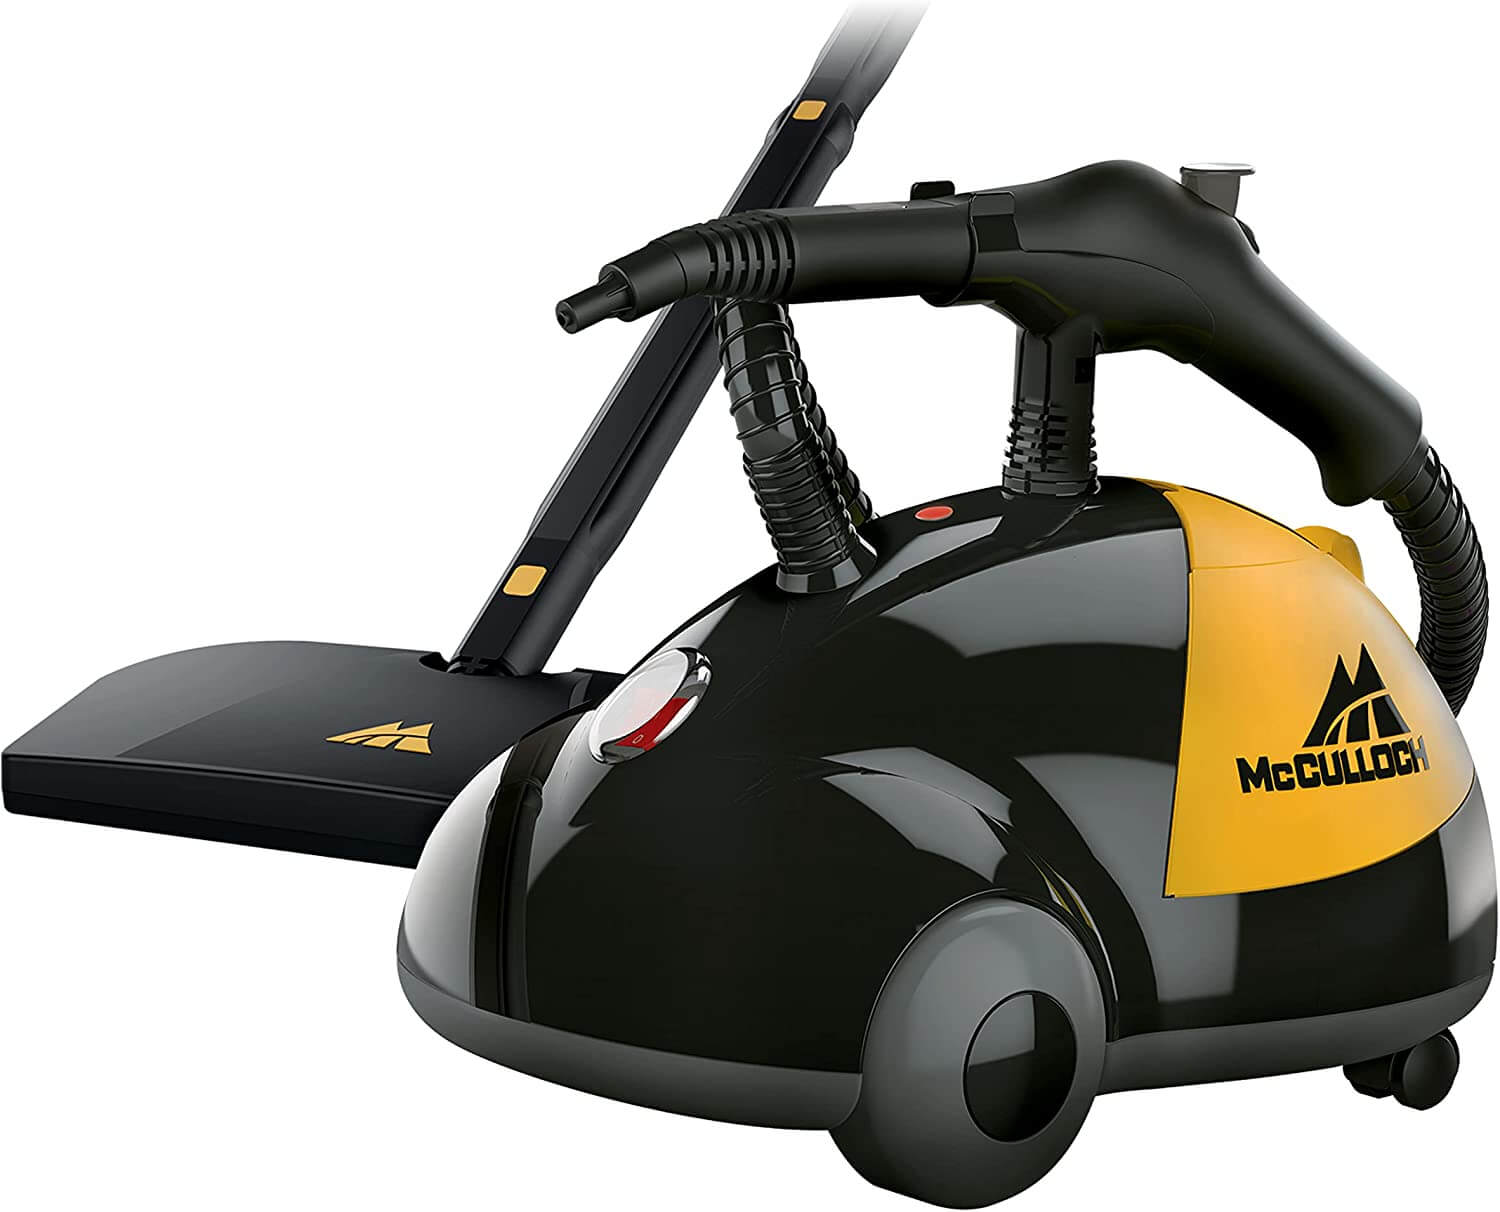
The McCulloch MC1275 is a canister steam cleaner equipped with a number of different steam cleaning accessories, including for steam mopping. If this is your first time using it, please take the time to learn how to use the McCulloch MC1275 in this beginner-friendly user manual.
McCulloch MC1275 Canister Steam Cleaner Manual
What’s in the box?
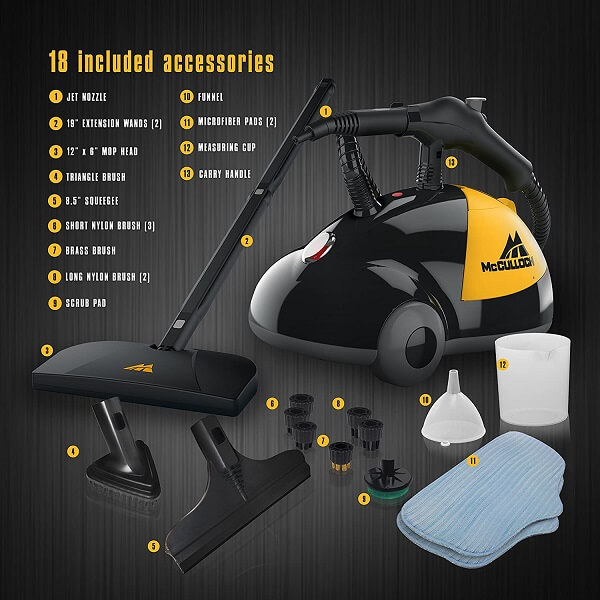
The following features and accessories are included with the purchase of a McCulloch MC1275 canister steam cleaner. Carefully inspect the packing material for all parts listed below:
- Lighted On/Off Switch - powers the unit on and off
- Steam Ready Light - illuminates while the unit is heating, then turns off when it is ready to begin steaming
- Storage Compartment - provides a convenient place to store small accessories
- Water Reservoir (internal) - the internal tank in which water is stored and heated
- Handle - designed to stay cool while providing the optimum amount of safety and comfort
- Steam Lock Switch - is pushed forward to lock the Steam Button down and provide continuous steam
- Steam Button - provides full steam-on-demand control
- Carry Handle - functions as a convenient holder for the Main Nozzle, and is designed for carrying the unit
- Main Nozzle - emits a powerful flow of steam when the Steam Button is pressed
- Steam Hose - safely channels the flow of steam from the Water Reservoir to the Main Nozzle
- Steam Jet Nozzle - focuses the flow of steam from the Main Nozzle, and serves as the base to which the Utility Brushes and Scrub Pad connect
- Extension Wands (2) - connect to the Main Nozzle (used with Mop Attachment or for high or hard-to-reach places)
- Mop Head - connects to the Extension Wands, and is designed for steam cleaning a variety of hard floor surfaces
- Microfiber Pads (2) - attach to the Mop Head, and are designed for removing scuffs and stains from hard floors
- Water Funnel - for ease in filling the Water Reservoir
- Measuring Cup - for ease in filling the Water Reservoir
- Squeegee - connects to either the Main Nozzle or Extension Wands, and can be used to clean mirrors, windows and other smooth glass surfaces
- Triangle Brush - connects to the Main Nozzle or Extension Wands, and is designed for cleaning corners and other difficult angles
- Nylon Utility Brushes (5) - connect to the Steam Jet Nozzle, providing extra scrubbing power for removing exceptionally tough dirt and stains
- Brass Utility Brush - connects to the Steam Jet Nozzle and is designed for removing tough stuck-on grease and grime from durable surfaces such as ovens and grills
- Scrub Pad - connects to the Steam Jet Nozzle and is designed to scrub tough dirt and scuffs from surfaces
- Screwdriver included for the carry handle assembly
Assembling the McCulloch MC1275 canister steam cleaner
Before using the steam cleaner, you need to assemble the McCulloch MC1275. This includes assembling the Extension Wands, Mop Head, Microfiber Pad, and the steam cleaning accessories.
1. Assembling the Extension Wands
IMPORTANT: Do not try to connect accessories while the unit is emitting steam. Do not use excessive force when mopping or using the Extension Wands as this may cause the wands to break.

- Select one of the Extension Wands. Insert end (A) of wand into Main Nozzle (B). Align the hole in the wand with the gray lock/release button on the nozzle.
- Press down on the gray lock/release button. While continuing to hold the button down, slide the Extension Wand onto the Main Nozzle until the button snaps through the hole on the wand.
- Slide the remaining Extension Wands (C) onto the end of the assembled wand (D), this time lining up the rectangular hole of the remaining wand with the gray lock/release button of the first wand. Press and hold the button, and firmly push the second wand onto the end of the first wand until the button snaps through the hole. Both Extension Wands should now be connected to the Main Nozzle.
2. Assembling the Mop Head
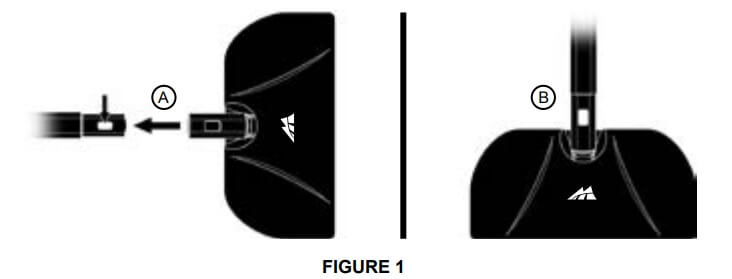
- Align the Mop Head with the open end of the Extension Wands, so that the rectangular hole in the Mop Head aligns with the gray lock/release button on the wand.
- Press down on the gray lock/release button. While continuing to hold the button down, slide the Mop Head onto the Extension Wands (See figure 1-A). Press on firmly until the button snaps through the hole (See figure 1-B).
3. Assembling the Microfiber Pads
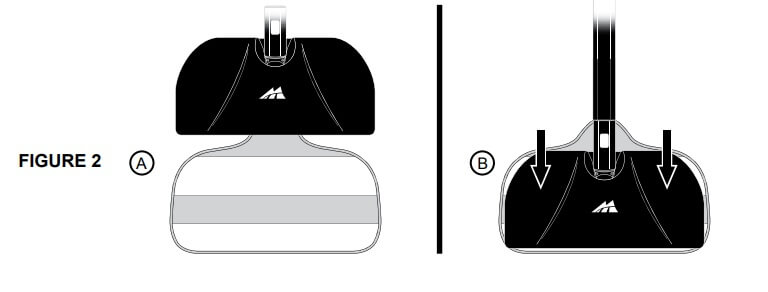
- Lay one Microfiber Pad on a flat surface, with the two fastener strips facing upward.
- Align the Mop Head with the Microfiber Pad. Make sure the Mop Head is oriented with the pad as shown, and centered as best as possible (See figure 2-A).
- Press the Mop Head firmly down onto the Microfiber Pad. The fastener strips will adhere to the pad grips on the underside of the Mop Head. The pad should now be attached and ready for use (See figure 2-B).
Before steaming any flooring, it is recommended to consult the manufacturer’s guidelines. For flooring in question, always test on a small inconspicuous area before proceeding.
The Mop Head and Microfiber Pads are perfect for use on hard floor surfaces including: sealed hardwood, sealed laminate, glazed ceramic, marble, tile, stained concrete, linoleum, granite, and vinyl.
Do not use the MC1275 steam cleaner on unsealed hardwood or unglazed ceramic surfaces. Surfaces that are not properly sealed may be warped or damaged by exposure to heat and moisture.
Care should also be taken when steaming sealed hardwood floors, as prolonged exposure to steam in a single spot may cause damage and discoloration. To avoid this, keep the Mop Head in constant motion on these surfaces. Steam may remove the sheen from some floors that have been treated with wax.
Extremely rough textured floors may tear or damage the Microfiber Pads. Be careful when handling a recently used Microfiber Pad, as it may still be hot.
4. Assembling the steam cleaning accessories
Before using the MC1275 canister steam cleaner, you need to assemble the steam cleaning accessories, which include the Steam Jet Nozzle, Squeegee, Triangle Brush, Utility Brushes, Scrub Pad, and Carry Handle.
Installing the Steam Jet Nozzle/Squeegee/Triangle Brush

- Select one of the three accessories (Steam Jet Nozzle, Squeegee or Triangle Brush), and align (A) end of accessory with the Main Nozzle (B). Align the hole in the accessory with the gray lock/release button on the nozzle.
- Press down on the gray lock/release button. While continuing to hold the button down, slide the accessory onto the nozzle until the button snaps through the rectangular hole.
The Steam Jet Nozzle, Squeegee and Triangle Brush can be connected to the end of an Extension Wand for reaching high or difficult spots. Connect the Extension Wand (or wands), then connect your desired accessory to the wand in the same way as you would normally connect to the Main Nozzle.
Installing the Utility Brushes

The Utility Brushes connect to the Steam Jet Nozzle, not the Main Nozzle. Here’s how to install them:
- Align the guide tab on the inside of the Utility Brush (A) with the groove on the bottom of the Steam Jet Nozzle tip (B).
- Firmly press the Utility Brush onto the tip of the Steam Jet Nozzle. Press it on as far as possible to prevent steam leakage (See figure 3-C).
- To remove the Utility Brush, simply grip it firmly and pull it off the Steam Jet Nozzle.
Installing the Scrub Pad
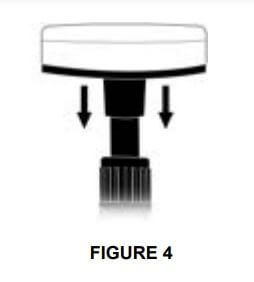
The Scrub Pad connects to the Steam Jet Nozzle, not the Main Nozzle. Here’s how to install it:
- Place the Scrub Pad over the tip of the Steam Jet Nozzle, and firmly press it on to the Steam Jet Nozzle as far as possible (See figure 4). This will help to prevent steam leakage.
- To remove the Scrub Pad, simply grip it firmly and pull it off of the Steam Jet Nozzle.
Installing the Carry Handle
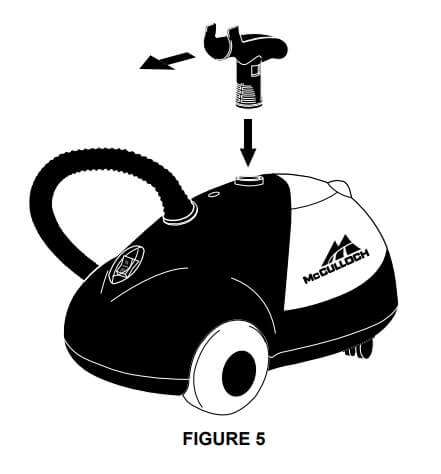
- Insert the Carry Handle into hole on top of the unit. Align the handle so that the grip bracket faces towards the front of the unit (See figure 5).
- Use the enclosed screwdriver to tighten the screw found inside the Carry Handle, until it is secured to the main unit.
Accessory recommendations
MC1275 Accessory | Recommended for |
|---|---|
Nylon Utility Brush | Ovens, stove tops, faucet fixtures, tile, grout, refrigerators, microwaves, showers, bathtubs, doorknobs, waste can, sports equipment, toys and changing tables. |
Steam Jet Nozzle | Removing dirt, grease and grime from cracks and crevices. Defrosting freezers. Dirt and grass in grooves of golf clubs. Dirt and grime in the tread of running shoes. Cleaning intricate precious metal and stone jewelry (not pearls or costume jewelry). |
Traditional Microfiber Pad | Vinyl, stone, slate, marble, sealed hardwood, glazed ceramic tile, granite, stained concrete, grout, linoleum, laminate, bamboo and other delicate floors. |
Squeegee | Bugs on windshield. Removing soap scum and grime. Glass, doors, and mirrors. |
Triangle Brush | Hard to reach corners on countertops, bathtubs and floors. |
Brass Utility Brush | BBQ grills and oven wire racks. |
Scrub Pad | Stone, slate, glazed ceramic tile and grout. |
Using the McCulloch MC1275 canister steam cleaner
Using the McCulloch MC1275 involves filling the water reservoir and using the steam cleaner itself. In order to reduce mineral build-up and prolong the life of your steamer, use distilled or demineralized water in the unit.
1. Filling the water reservoir
- Place the multi-use steam canister on a flat, level surface.
- Make sure the lighted On/Off switch is turned to “Off” and the grounded power cord is unplugged from the electrical outlet.
- Flip the storage compartment lid open, and unscrew and remove the water reservoir cap.
- Drain any water remaining inside the water reservoir. The water reservoir should be emptied after each use – this will help minimize mineral build-up and prevent over-filling.
- Fill the measuring cup to maximum fill line (16 oz./473 ml.) with water.
- Insert the water funnel into the fill hole and carefully pour the water from the measuring cup into the water reservoir.
- Depending on how long you intend to steam, you may repeat steps 5 and 6 up to two more times, up to a maximum of 48 oz. (1,420 ml.) of water. 16 oz. of water translates to 15 minutes of steam, 32 oz. of water translates to 30 minutes of steam, and 48 oz. of water translates to 45 minutes of steam.
- Replace the water reservoir cap, ensuring that it is screwed on tightly to prevent hot steam from escaping and causing injury.
- Close the storage compartment lid.
Remember, if the unit has been in use, please allow the unit to cool for at least 20 minutes. Press and hold the Steam Button to release ALL of the remaining steam before refilling the water reservoir. Failure to follow these precautions may result in burns from escaping steam when the water reservoir cap is removed.
Caution should always be used when pouring water into the water reservoir. Do not look directly down into the fill hole when filling. Keep your free hand and any children or pets at a safe distance.
2. Using the steam cleaner
Be sure that the water reservoir has been filled and that all desired accessories are connected before following these steps. Here’s how to use the McCulloch MC1275 canister steam cleaner:
- Plug power cord into an electrical outlet. For first time use, remove the protective plastic cover from the electrical plug.
- Switch the lighted On/Off Switch to “On” position. The Steam Ready Light will immediately illuminate, indicating that the unit is heating.
- The Steam Ready Light will turn off in 2-8 minutes (depending on how much water is in the water reservoir), indicating that the unit is fully heated and ready to begin steaming.
- Direct the nozzle (and any connected accessory) towards the surface you desire to steam, and press the Steam Button. To sanitize surfaces, point the nozzle, press the button and hold approximately 1/2 inch from the surface for at least 5 seconds. This will ensure that you have killed germs and bacteria. Always be sure that the nozzle and any accessory are pointed in a safe direction (away from yourself, other people, pets, and plants) before pressing Steam Button.
- Keep the Steam Button pressed for a continuous flow of steam. You may also slide the steam lock switch forward while pressing the Steam Button to lock it down. This will allow a continuous flow of steam without the need of holding the button down manually.
- Use a back-and-forth motion over the area you are steaming to enhance the cleaning process. Wipe steamed areas with a clean cloth to remove loosened dirt and grime. Wiping the area while it is still wet is recommended, but use caution when wiping surfaces such as metal that may still be hot.
- Once the steaming tasks are complete, turn the unit “Off” and unplug.
IMPORTANT: During use, the Steam Ready Light may illuminate. This is normal. If you notice a drop in steam pressure, release Steam Button until the Steam Ready Light turns off again.
3. Using the steam mop
The steps for steam mopping are slightly different from the above. You need to replace the nozzle with the microfiber mop pad. It is recommended to sweep or vacuum hard floors before steam mopping.
- Plug power cord into an electrical outlet. For first time use, remove the protective plastic cover from the electrical plug.
- Switch the lighted On/Off Switch to “On” position. The Steam Ready Light will immediately illuminate, indicating that the unit is heating.
- The Steam Ready Light will turn off in 2-8 minutes (depending on how much water is in the water reservoir), indicating that the unit is fully heated and ready to begin steaming.
- For the best results, use a continuous back-and-forth motion over a floor surface, pushing the Mop Head away and pulling it back towards you. Work your way backwards over the floor, in order to avoid walking over freshly mopped areas.
- The Microfiber Pad will absorb dirt and moisture during mopping. However, when you are finished you may find some residual moisture has been left behind. In this case, it is recommended to allow floor time to air-dry. A fan may be directed towards the mopped area to speed up the drying process.
After use and storage
Preparing the McCulloch MC1275 canister steam cleaner for storage is quick and simple. When you have finished your steaming tasks, follow the steps listed below:
- Turn the unit “Off” and unplug the power cord.
- Allow the unit to completely cool (at least 30 minutes).
- Press and hold the Steam Button to release all the remaining steam.
- Remove all accessories from the unit.
- Flip the storage compartment lid open and remove the water reservoir cap.
- Drain any remaining water from the water reservoir into a sink or tub – this will help to minimize mineral build-up and prevent overfilling during your next use. Replace the water reservoir cap.
- Store the accessories. The Utility Brushes can be conveniently stored in the storage compartment.
- Close the storage compartment lid and store the MC1275 steam cleaner in a cool, dry location.
Final words
And there you have it, the manual for the McCulloch MC1275 canister steam cleaner. By taking the time to learn how to use it, you will clean more efficiently and keep the machine running longer.
Related articles:
